How to grow garlic, the most popular fall-planted bulb in the US
Garlic is not just a tasty ingredient found in dozens of recipes, it’s also very nutritious and full of some amazing health benefits.
I was surprised to learn recently that, according to Google Trends data gathered by AllAboutGardening.com, the most popular fall-planted crop in the United States is … garlic.
My guess would have been kale. Possibly beets. Maybe Brussels sprouts. But garlic?
Inspired, I conducted my own deep dive into Google’s search trends, comparing Americans’ interest in growing garlic with interest in growing other fall-planted bulbs, like tulips, daffodils, hyacinths and crocus. Surely, colorful blooms would trump the spicy, pungent vegetable.
No. When people used the search term “how to grow…,” garlic was again the frontrunner when compared with those spring bulb plants. I was so gobsmacked that for the first time in my life, I used the word “gobsmacked.”
Could it be that Americans have a previously undisclosed obsession with garlic? Or are we collectively perplexed about how to grow it? I love garlic as much as the next girl, but I suspect it’s the latter, which would explain all the “how to” queries.
People are also reading…
Growing garlic, however, is every bit as easy as growing daffodils. There are just a few things to know before you plant it:
There are two types of garlic — hardnecks and softnecks. Plant the type best suited for your climate.

This is a crop of freshly harvested hardneck garlic.
Hardneck varieties are recommended for northern regions, where they should be planted 6-8 weeks before a hard frost. Their heads are comprised of a single row of large cloves formed around an underground stem. They are more flavorful than softnecks but don’t store as long.
Softneck varieties are better suited for growing in warmer climates, and their heads contain several stacked rows of smaller cloves. Due to their longer shelf life, softnecks are typically sold in supermarkets.
Garlic plants are heavy feeders, so incorporate a generous amount of compost into the top 3-4 inches of soil to increase its fertility. Include a helping of mycorrhizae fungus to boost bulb formation.
Plant only seed garlic purchased from a reputable supplier — or cloves from the largest, healthiest heads saved from last year’s harvest.
Supermarket garlic should not be planted because it is often treated with growth inhibitors to prevent sprouting at the store and in your refrigerator. It also may not be the type best suited for your growing conditions.
Separate the head into individual cloves without removing their papery skins. Plant the cloves, pointy end up, about 2 inches deep and 6 inches apart in rows spaced 12 inches apart.
Cover with soil, tamp it down and water well.
In regions where winter temperatures drop below 40 degrees, mulch the bed heavily with seed-free straw. Avoid using hay, which contains grass or grain seeds and is likely to turn your bed into a weedy mess. Water the straw to settle it into place.
It’s normal for plants to sprout during autumn and early winter, even in northern climates; leave them be.
Remove the mulch in spring, after the danger of frost has passed, and sprinkle a line of pelleted fertilizer or blood meal alongside each row, a few inches from stems. Keep the bed free of weeds, which may outcompete your crop for soil nutrients.
Hardneck varieties will send up tall, leafless stems called scapes in late spring. Remove them to allow the plant to focus its energy on underground bulb formation. The mildly garlic-flavored scapes are a seasonal delicacy that can be added to salads, cooked in soups or sautéed with other vegetables.
Softneck garlic varieties do not produce scapes.
Your garlic will be ready to harvest in mid-to-late summer when at least 50% of the plant has turned yellow. Rather than pull the bulbs, which would risk damaging them, carefully dig them out and brush off the soil, but don’t rinse them.
Set hardneck varieties with their stems attached on a drying rack or screen, then place in a well-ventilated, cool, dry spot for two weeks. Stems of softneck varieties can be braided and hung to dry. The cured garlic’s papery skin will help extend its shelf life.
Store bulbs in a cool, dry spot. Hardnecks will remain fresh for at least 3-6 months; softnecks will last up to 9 months.
5 common ailments in vegetable gardens and how to treat them
Garden threats

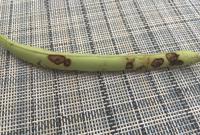
This image provided by University of Maryland Extension shows anthracnose disease symptoms of a bush bean.
You started seeds in spring and watched as they sprouted, then watered, fertilized and even staked plants as they grew, while visions of summer salads, grilled vegetables and homemade pickles danced in your head.
Then one day, black blotches, yellow-spotted leaves and mushy bottoms showed up, and your dreams turned to nightmares.
Many home gardeners lovingly tend their plants only to find them ravaged by unknown forces before harvest time.
But fear not: Here are some tips for identifying and treating five of the most common ailments that threaten your crops.
Anthracnose

This image shows a pumpkin with lesions symptomatic of anthracnose, a serious fungal disease affecting crops like beans, cucumbers, eggplants, melons, peas, peppers, tomatoes, pumpkins and spinach.
A fungal disease that affects beans, cucumbers, eggplants, melons, peas, peppers, tomatoes, pumpkins and spinach. Anthracnose presents as small leaf spots with yellow halos that gradually darken and spread to cover entire leaves. On cucumber plants, foliage may drop, and entire vines may die. Tomatoes and peppers exhibit dark, sunken spots that become more apparent as fruit matures. Pea pods become marred with dark lesions. Round, sunken, yellow spots appear on melons, darkening to brown and then black.
To prevent this, try rotating crops, amending soil with compost before planting and applying mulch afterward. Seek out resistant plant varieties, when available. Avoid overhead watering, which wets foliage and encourages fungal growth. And keep the soil clear of infected plant parts and fallen fruit.
Treat infected plants with a fungicide containing chlorothalonil or copper, carefully following the instructions and safety precautions on the package.
Blossom end rot
Caused by a calcium deficiency that mainly affects tomatoes, eggplant and peppers. Characterized by dark, mushy spots on fruit bottoms, the disorder typically results from inconsistent watering, improper soil pH, injured roots or excess nitrogen.
Prevention measures include testing the soil’s pH before planting. If results are lower than 6.3, incorporate dolomitic lime into beds according to label directions.
Avoid damaging the roots by installing stakes and cages around tomatoes at planting time, instead of when plants — and roots — are larger. And don’t plant a vegetable garden in or near a lawn that receives fertilizer, which can raise the nitrogen level of the surrounding soil.
Treat affected plants by drenching leaves with a calcium spray until the product drips off. Fruit produced after treatment is usually symptom-free, although sometimes a second application is necessary.
Squash vine borer

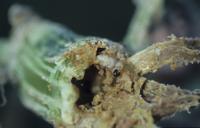
This image shows a squash vine borer larva and its telltale “frass” excrement inside a hollow squash stem.
Zucchini, squash, cucumber and muskmelon plants die quickly after blooming, without so much as a goodbye. But if you look closely, you’ll see the small puncture holes in the bottoms of stalks and stems caused by these pests, which start life as moths that lay eggs at the base of plants. Inch-long white caterpillars follow and bore into stalks, killing plants as they chew their way around and out. And just when you think the damage is done, they cocoon in the soil until the following year, armed and ready to repeat the carnage.
Prevent damage by monitoring susceptible plants closely. Watch for red, flat, oval eggs early in the season and pick them off by hand. Keep hunting every week.
And if you find signs of damage like punctures and frass, their sawdust-like excrement, use a razor blade to slice affected stems open near the holes and manually pick out the borers. Cover the slits with mounded soil to encourage new root growth.
If necessary, treat plants with Bacillus thuringiensis, or Bt, a bacterial insecticide (several versions are available; seek the one labeled as a control against squash vine borer).
Wilt diseases
Verticillium and fusarium wilt are soil-borne fungal diseases caused by different pathogens that result in similar symptoms.
Primarily affecting eggplants, peppers, potatoes, pumpkins and tomatoes, the diseases ravage roots, resulting in curled, yellow and wilted foliage, brown xylem tissue inside stems and overall stunting. Eventually, entire plants wilt and die.
This is one instance where a good offense is the only defense: Avoid infection by planting resistant varieties (check plant tags for V, F, VF or VFN, resistance indicators for verticillium wilt, fusarium wilt and nematodes). Rotate crops by keeping infected beds free of susceptible plant species for three or four years, essentially starving the disease of a host to clear the pathogen from the soil. And regularly clean up fallen leaves, fruit and plant debris.
Slugs

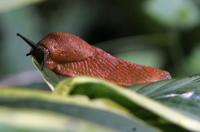
A slug nibbles at the leaf of a hosta in a garden in this 2007 file photo.
Jagged holes, typically in leaf centers rather than edges, indicate slug damage. The nocturnal gastropods feast on basil, cabbage, cucumbers, lettuce, tomatoes, peppers, and ornamental plants like hostas, leaving a telltale slimy trail behind.
Get ahead of the slithering miscreants with a spring cleanup that clears leaves, plant debris and slug eggs from the soil surface, and keep mulch no deeper than 3 inches to avoid creating a haven.
Sink a small can or jar into the soil around affected plants, leaving about an inch exposed above ground, then fill it halfway with beer. Slugs will crawl in for a drink and drown. Alternately, if you aren’t squeamish, you might go into the garden at feeding time (overnight) and sprinkle a bit of salt on each of your little visitors. As their bodies attempt to dilute the irritant, slugs will dehydrate and die. But don’t be tempted to sprinkle salt around plants. Doing so would risk damaging the soil.
For all the latest Life Style News Click Here
For the latest news and updates, follow us on Google News.


