7 underrated Steam features you should try right now
You may have logged thousands of hours on your favorite games through Steam, but that doesn’t mean you know everything there is to know about Valve’s gaming platform itself.
After all, for most of us, we’re more interesting in messing around on our games than we are in messing around with the client platform we run them through. Steam is simply a tool to find, download and play games.
However, it pays to learn a few tips and tricks about Steam. Doing so can improve your gaming experience, or simply iron out some of Steam’s annoying creases. With that in mind, here are 6 of our favorite Steam features and tricks which we think every gamer should know.
7 Steam features you’ll wish you knew about sooner
If you’ve not currently got Steam installed on your computer, check out our guides on how to install Steam on Windows and how to install Steam on Mac, where we’ll walk you through how to download and install the application.
1. Change the Steam Overlay shortcut
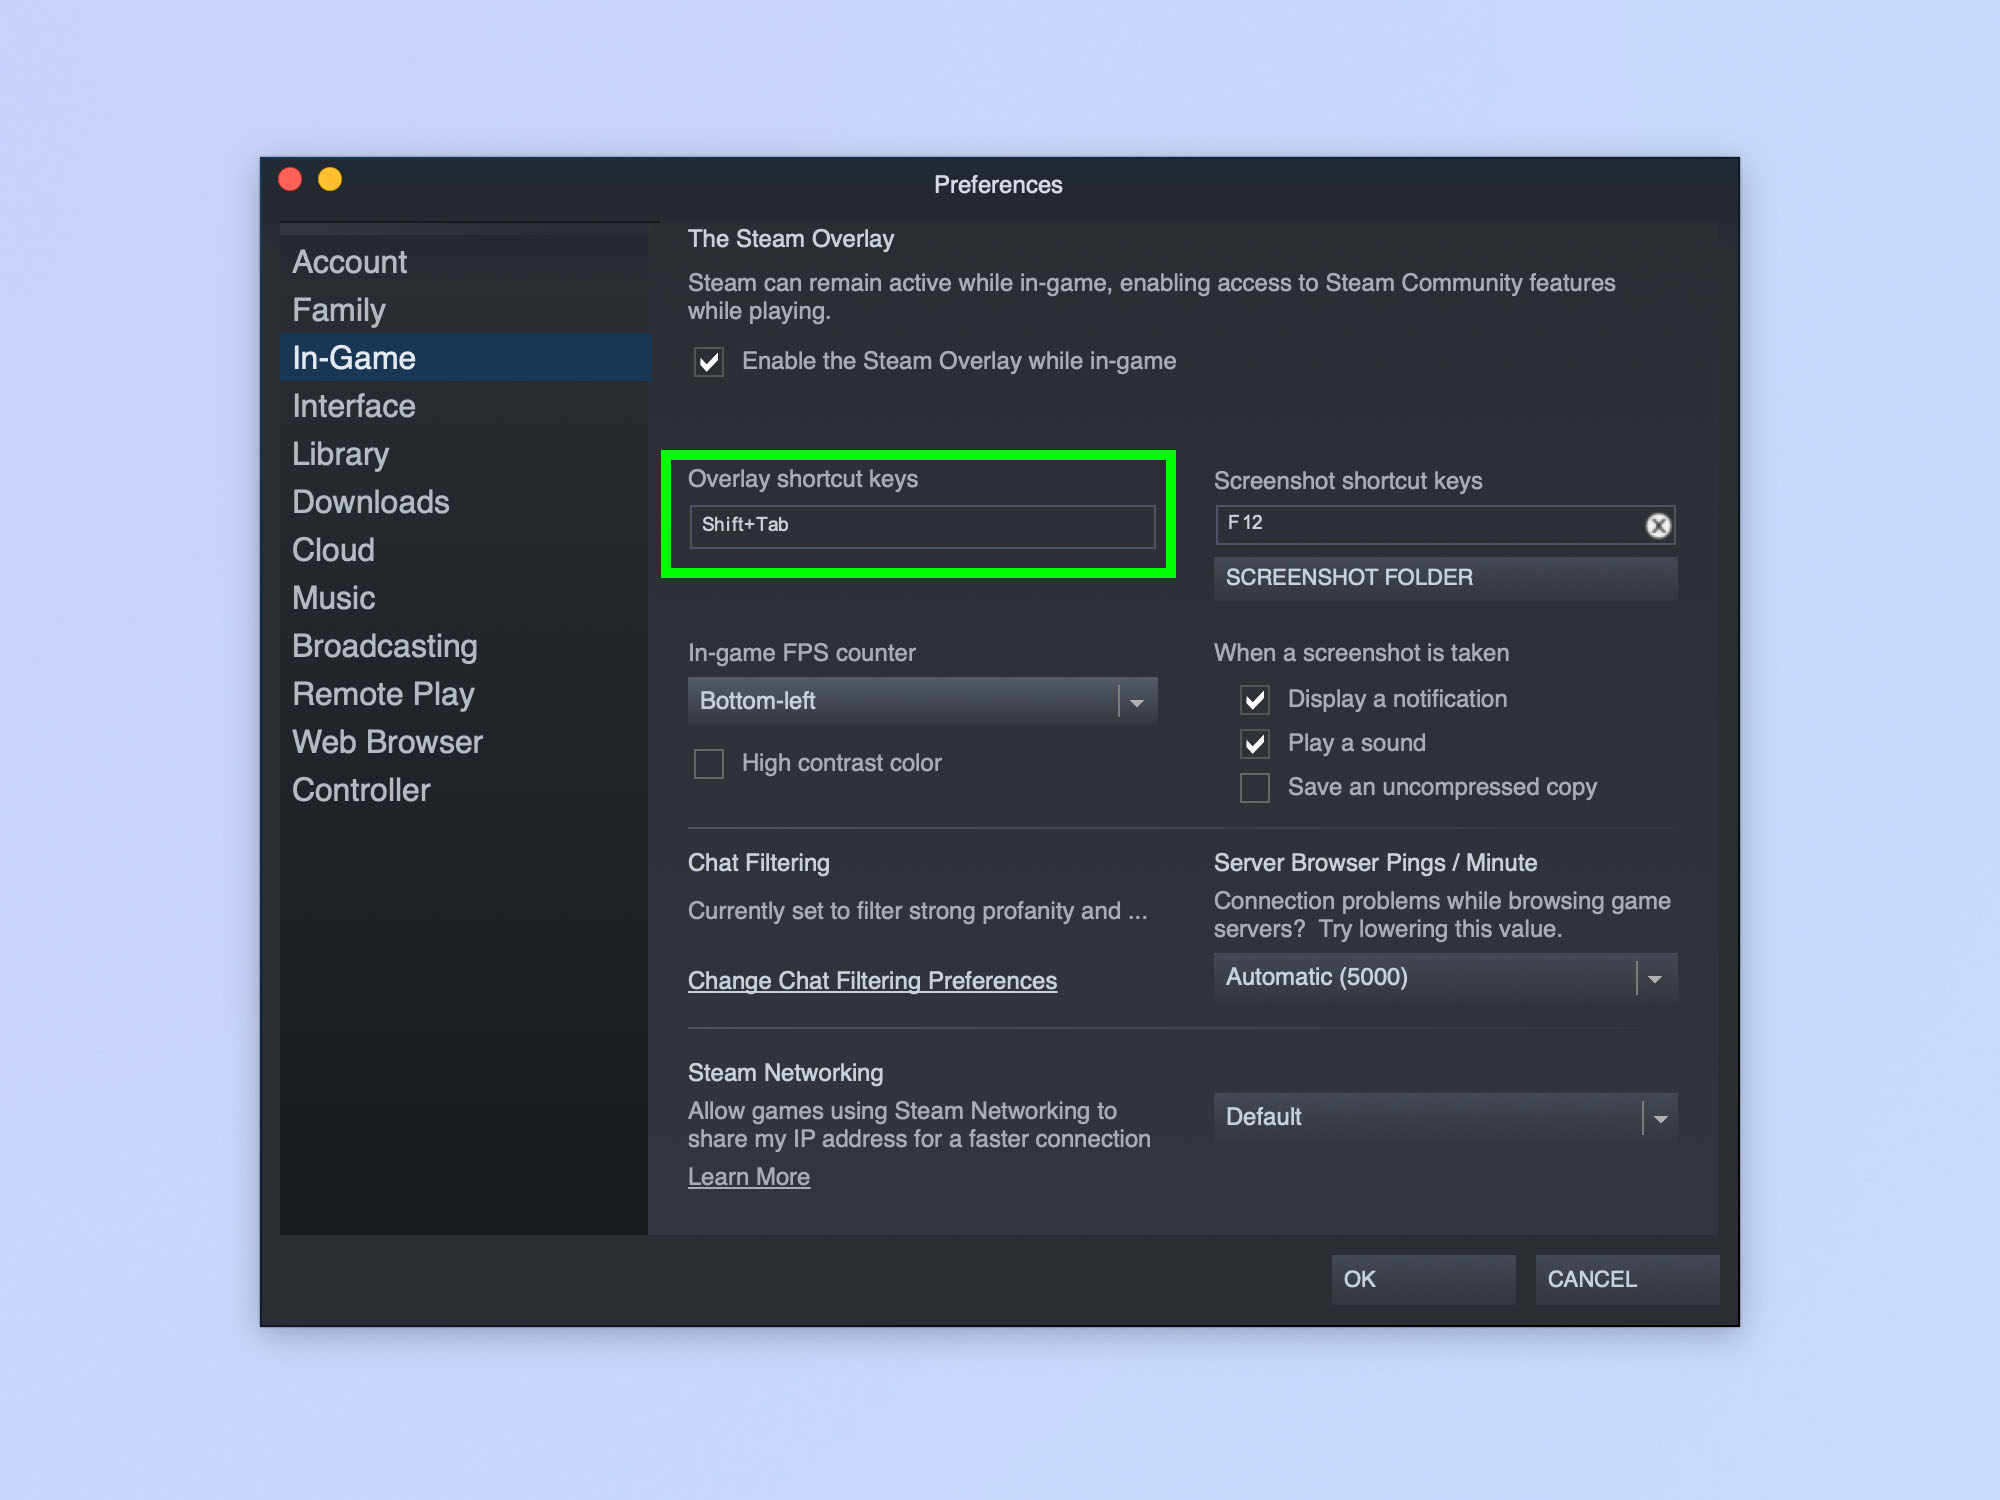
The Steam Overlay is a feature that allows you quick access to essential Steam functions while you’re gaming, like chat or a web browser. The default shortcut to access the Overlay is Shift + Tab. However, if you’re anything like me, you’re constantly knocking the shortcut by accident while holding shift down in game — to sprint for example. This shortcut can also be a pain when Shift + Tab is an assigned shortcut in game too! Luckily, you can change the shortcut to something more convenient.
1. Open Settings/Preferences — to do this, click Steam, top left, then click Settings (Windows) or Preferences (Mac).
2. Select In-Game, then click the box underneath Overlay shortcut keys, where it says Shift+Tab.
3. On your keyboard, press the buttons you want to function as the shortcut, for example Shift+F11.
2. Enable the in-game FPS counter
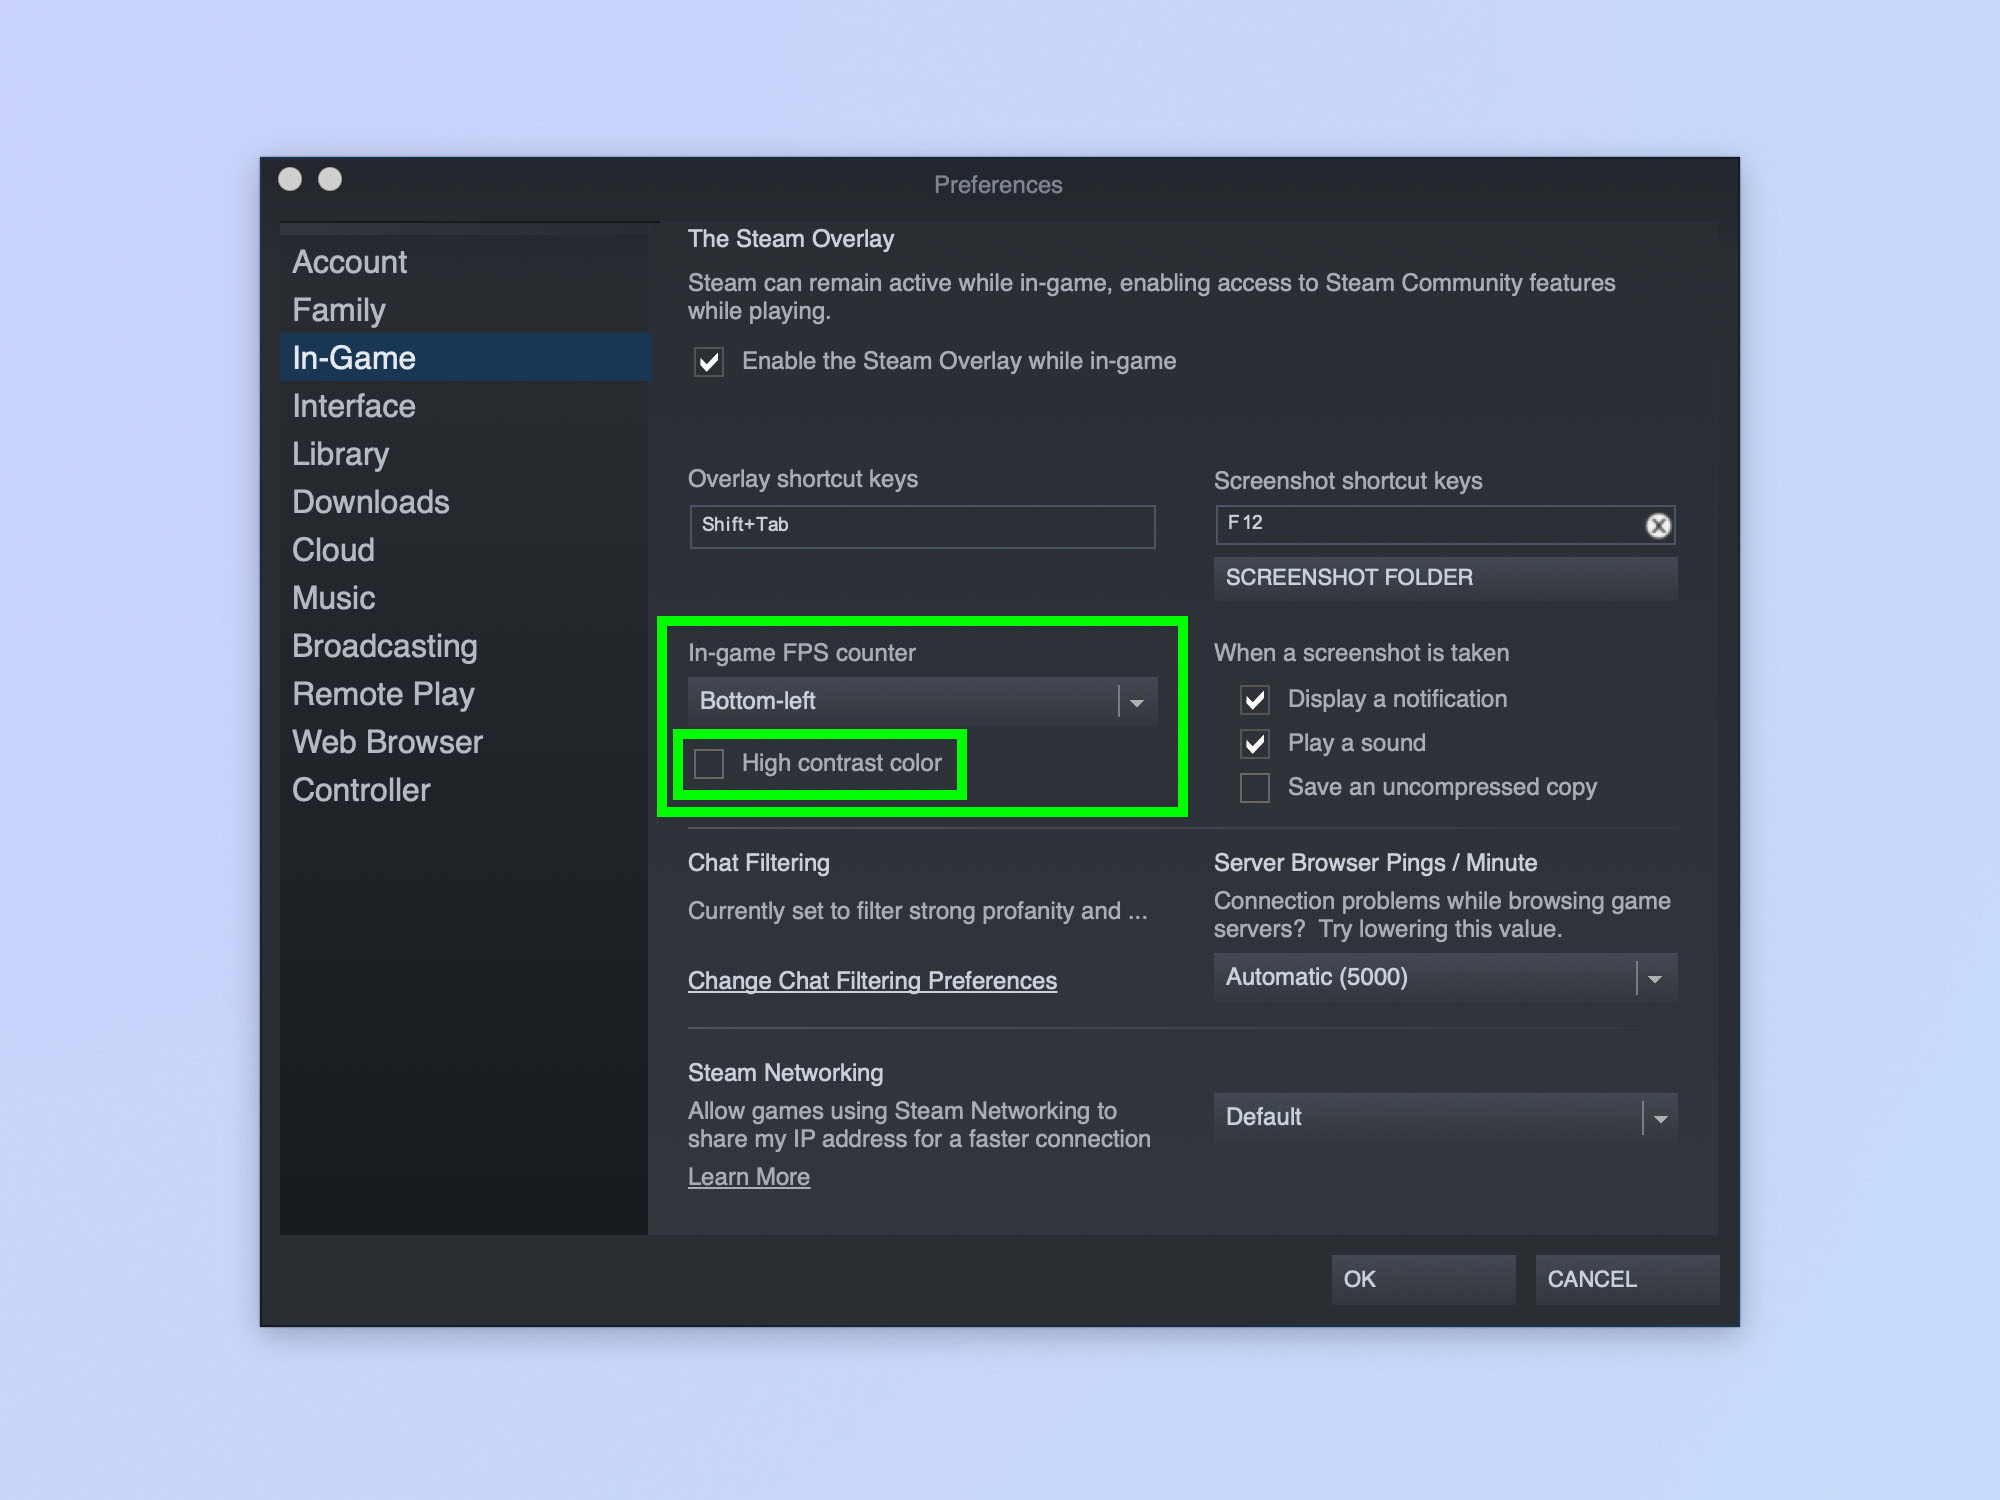
When I’m properly frame-chasing — usually when I get a new game and am tweaking settings to maximize FPS — I use MSI Afterburner. It’s pretty much the go-to for gamers wanting to measure all of their PC’s performance metrics while playing. However, even on larger screens, I find Afterburner a little intrusive, so I don’t really like to use it once I’ve got a game set up well. It’s still good to keep an eye on your FPS count though, so you can check how your PC is performing in real time. That’s where Steam’s in-game FPS counter comes in. It’s an unobtrusive little FPS counter that can sit in any of the four corners of the screen, plus it can be set to a high contrast color to make sure you always see it.
1. Open Settings/Preferences and click In-Game.
2. Click the in-game FPS counter dropdown and select a corner for it to appear. By default it’s set to Off — selecting a corner turns it on.
3. Check the High contrast color box to have the counter display in luminous green (optional).
3. Allow downloads during gameplay
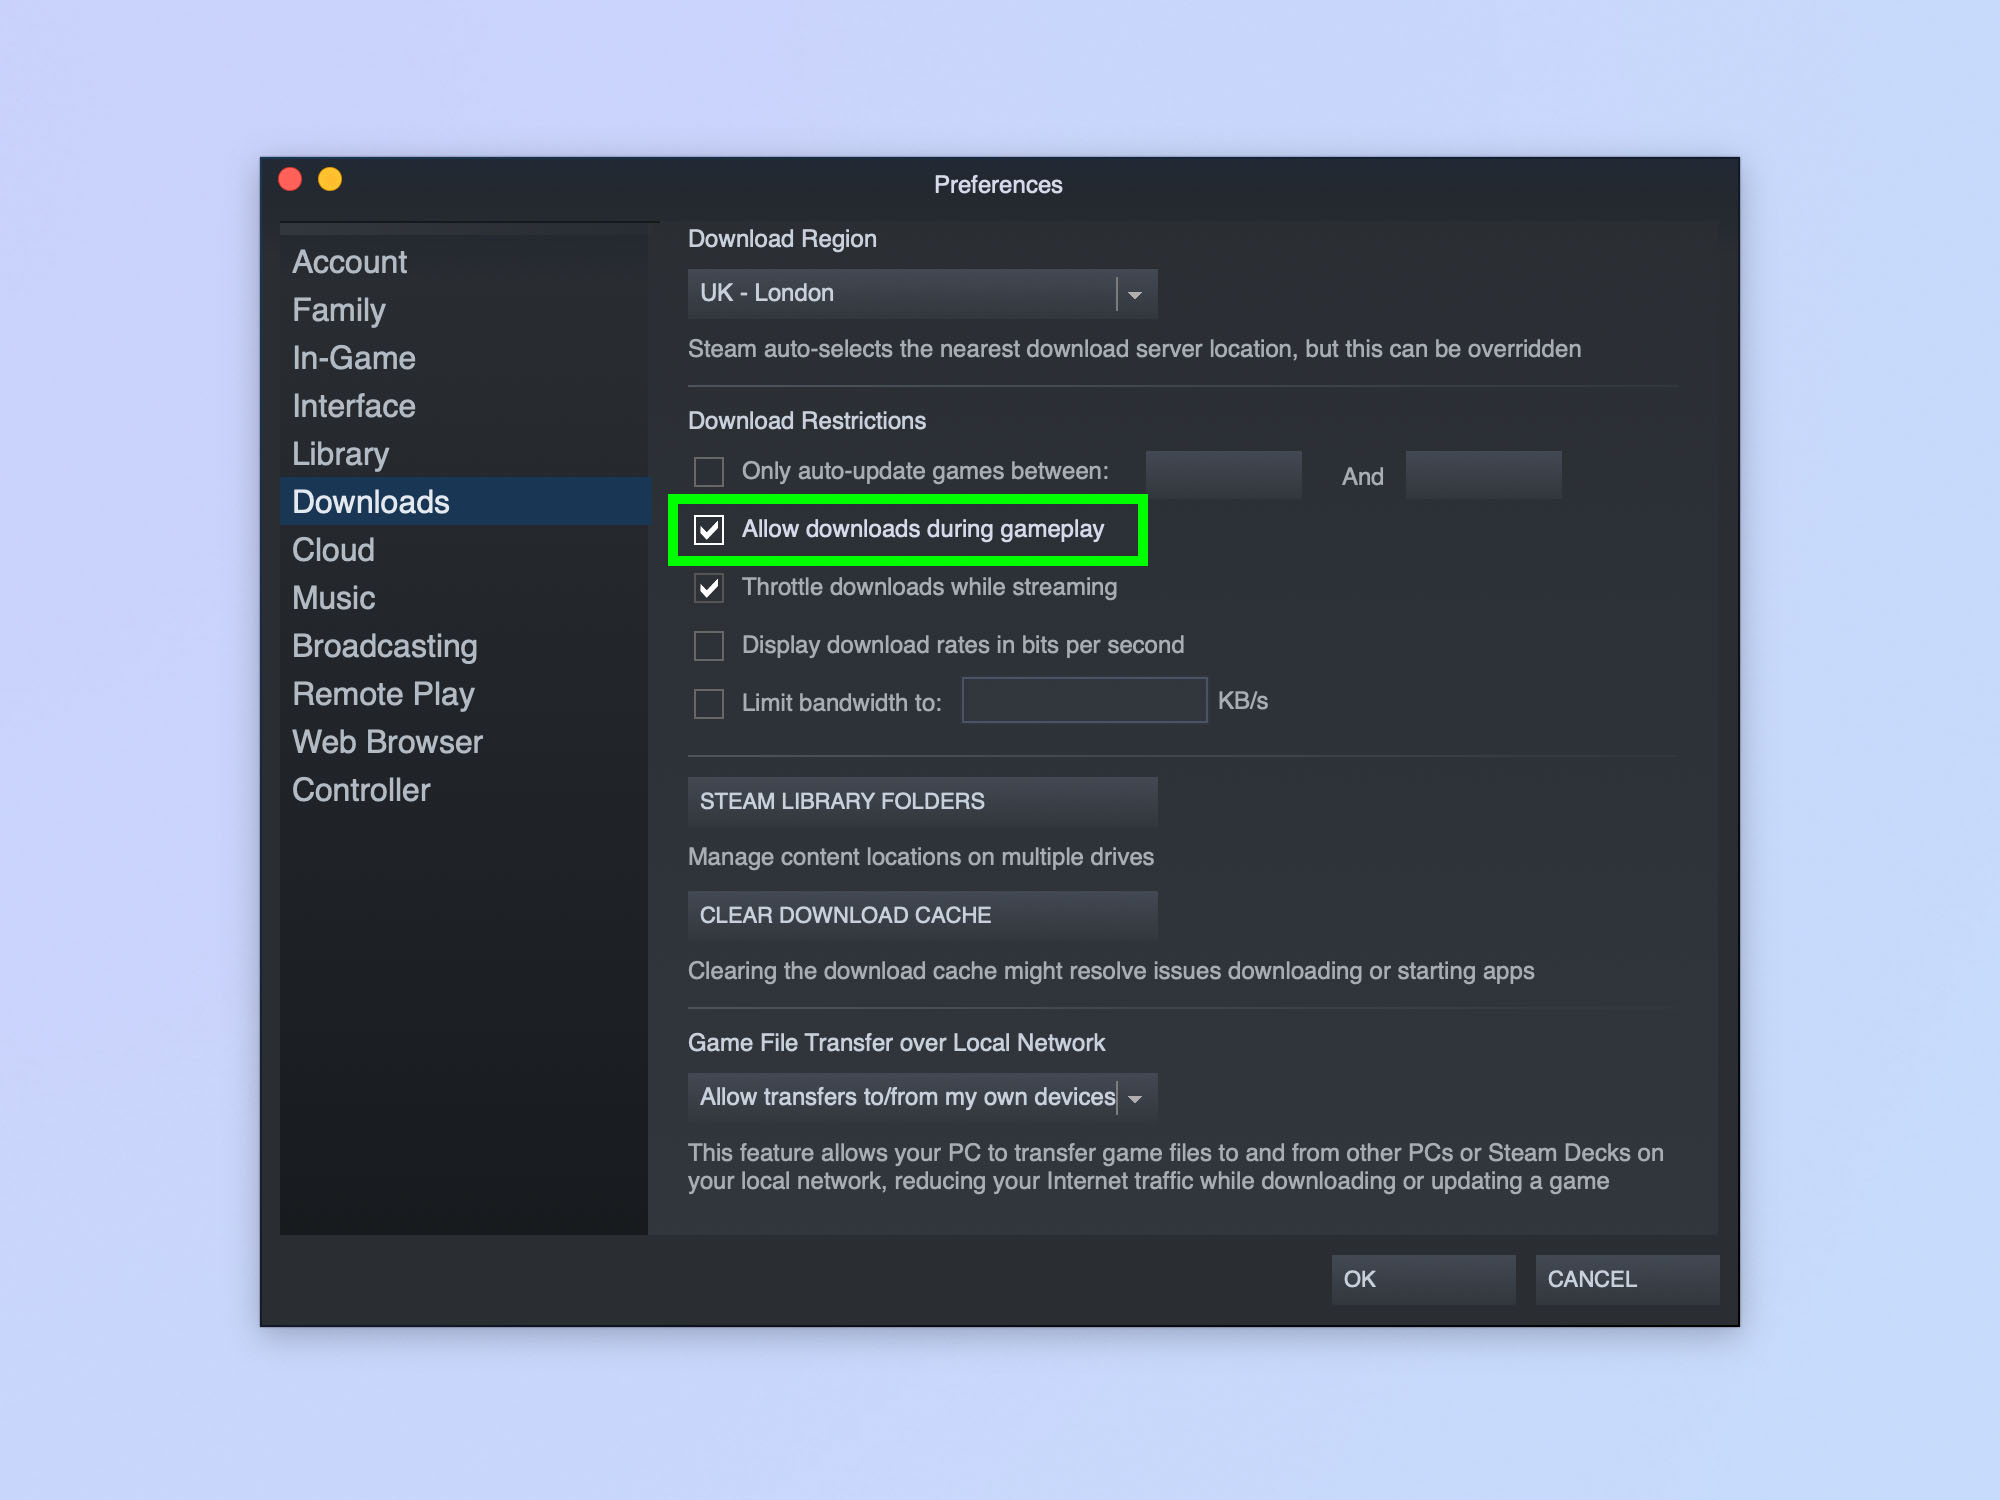
Have you ever started downloading a game, then gone to play another game while you wait, only to find that, 8 hours later, the game you were downloading still hasn’t finished? That’s because, by default, Steam doesn’t allow downloads while you’re gaming. This obviously ensures you have maximum bandwidth for online games, but if you’re playing an offline game, you’ll want to change it. Simple repeat the steps below to set disallow downloads during gameplay when you’re playing online games (or just pause all downloads when you start playing, which is what I do).
1. Open Settings/Preferences and click Downloads.
2. Click the Allow downloads during gameplay check box.
4. Enable Remote Play
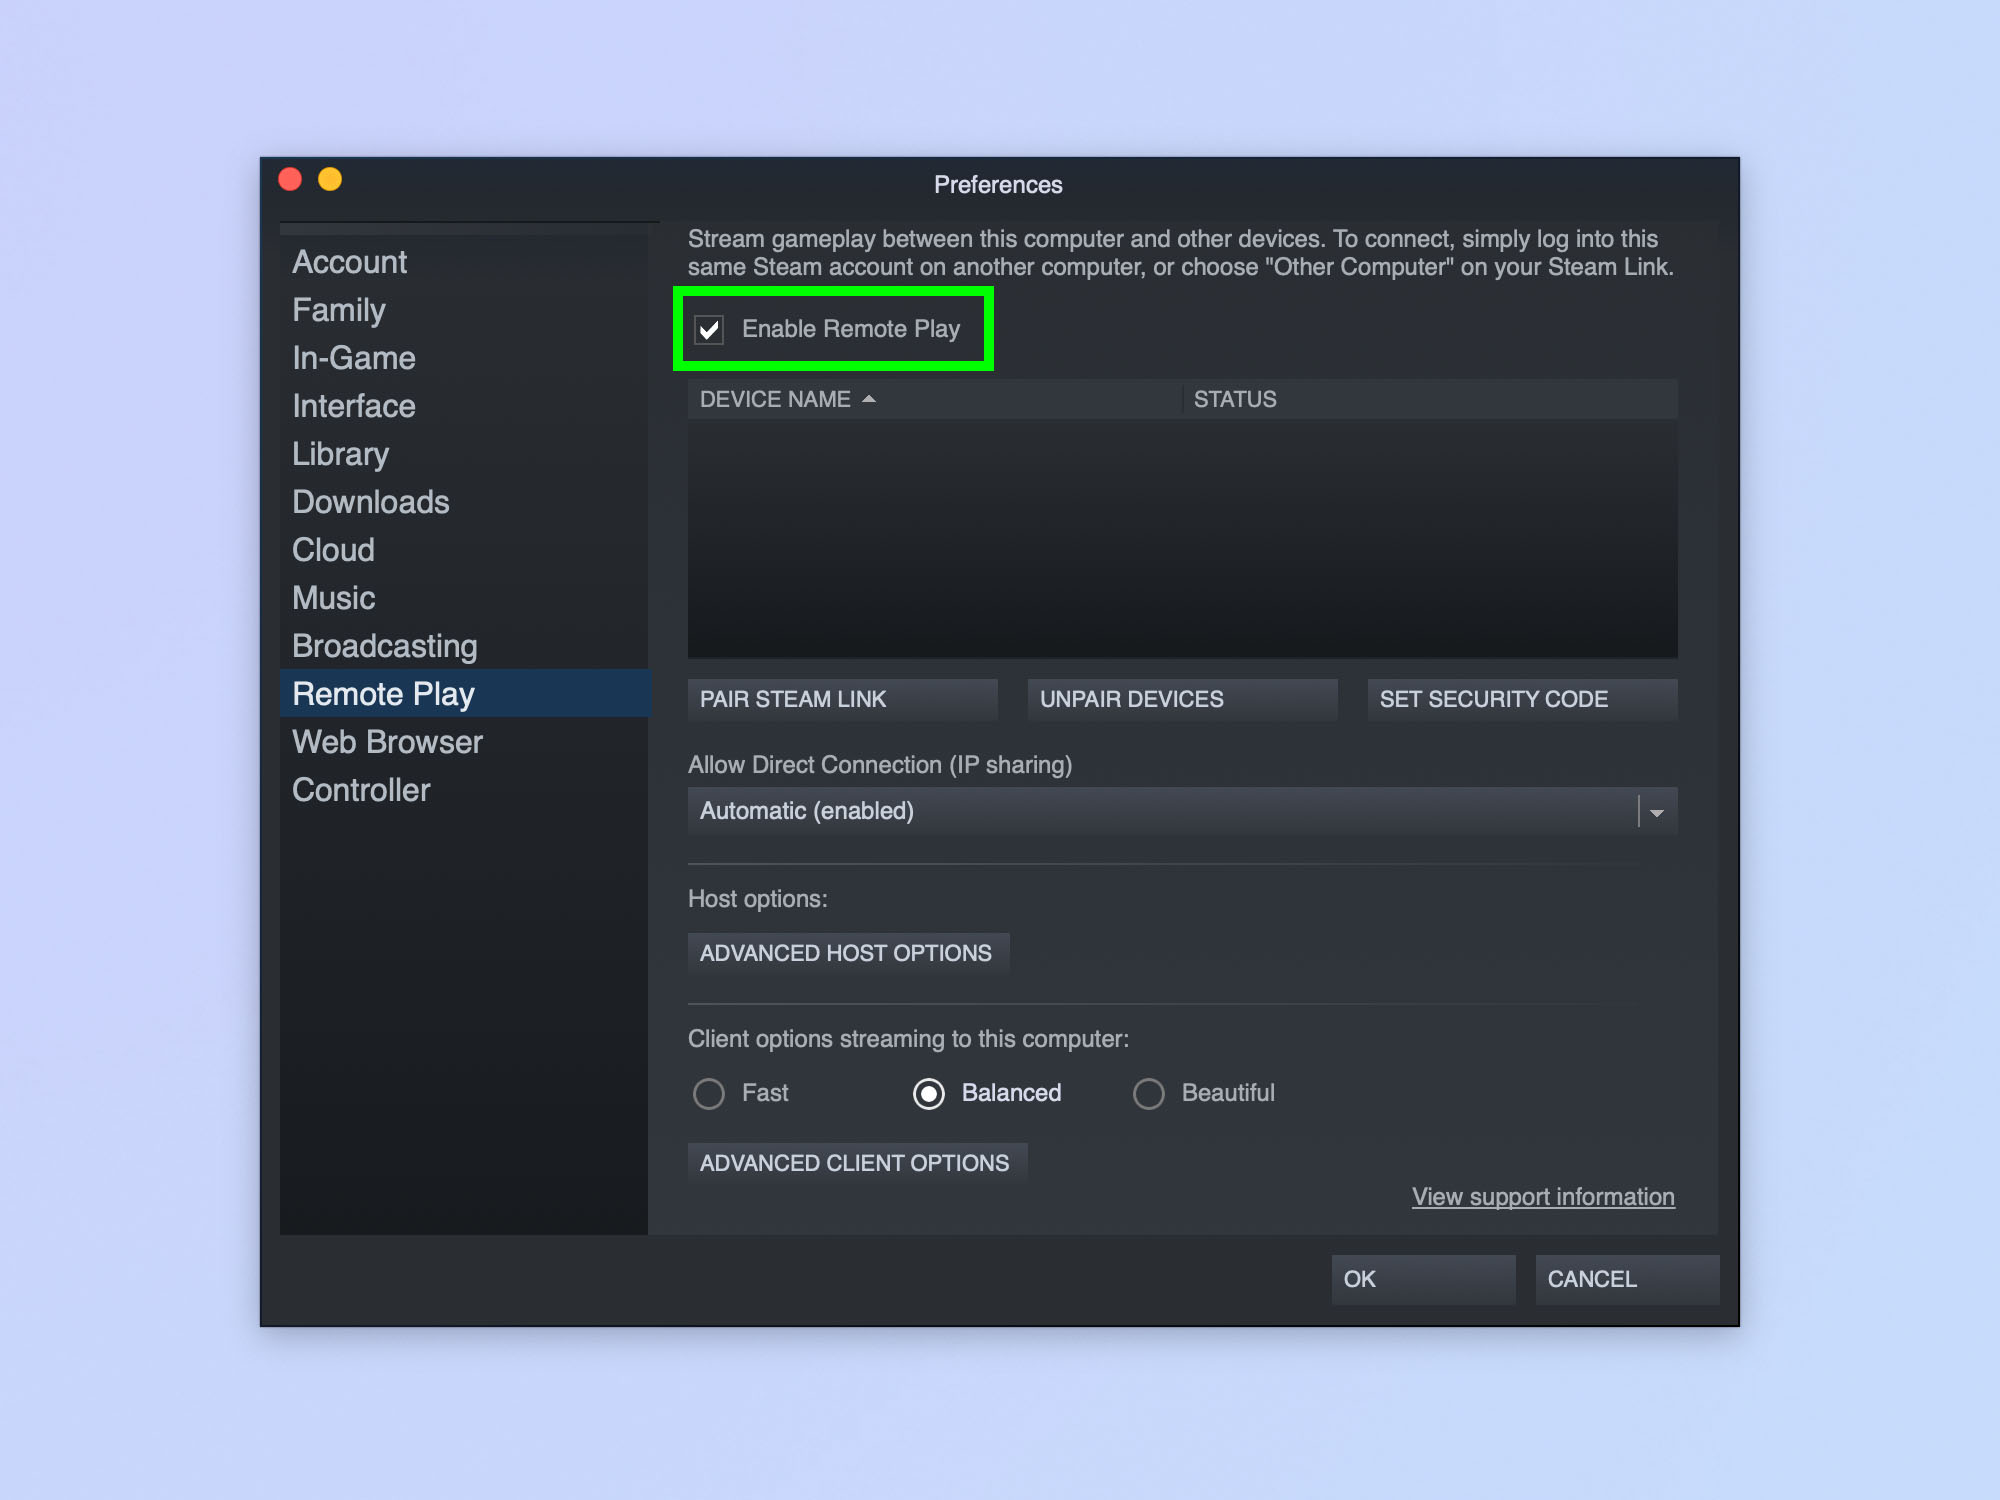
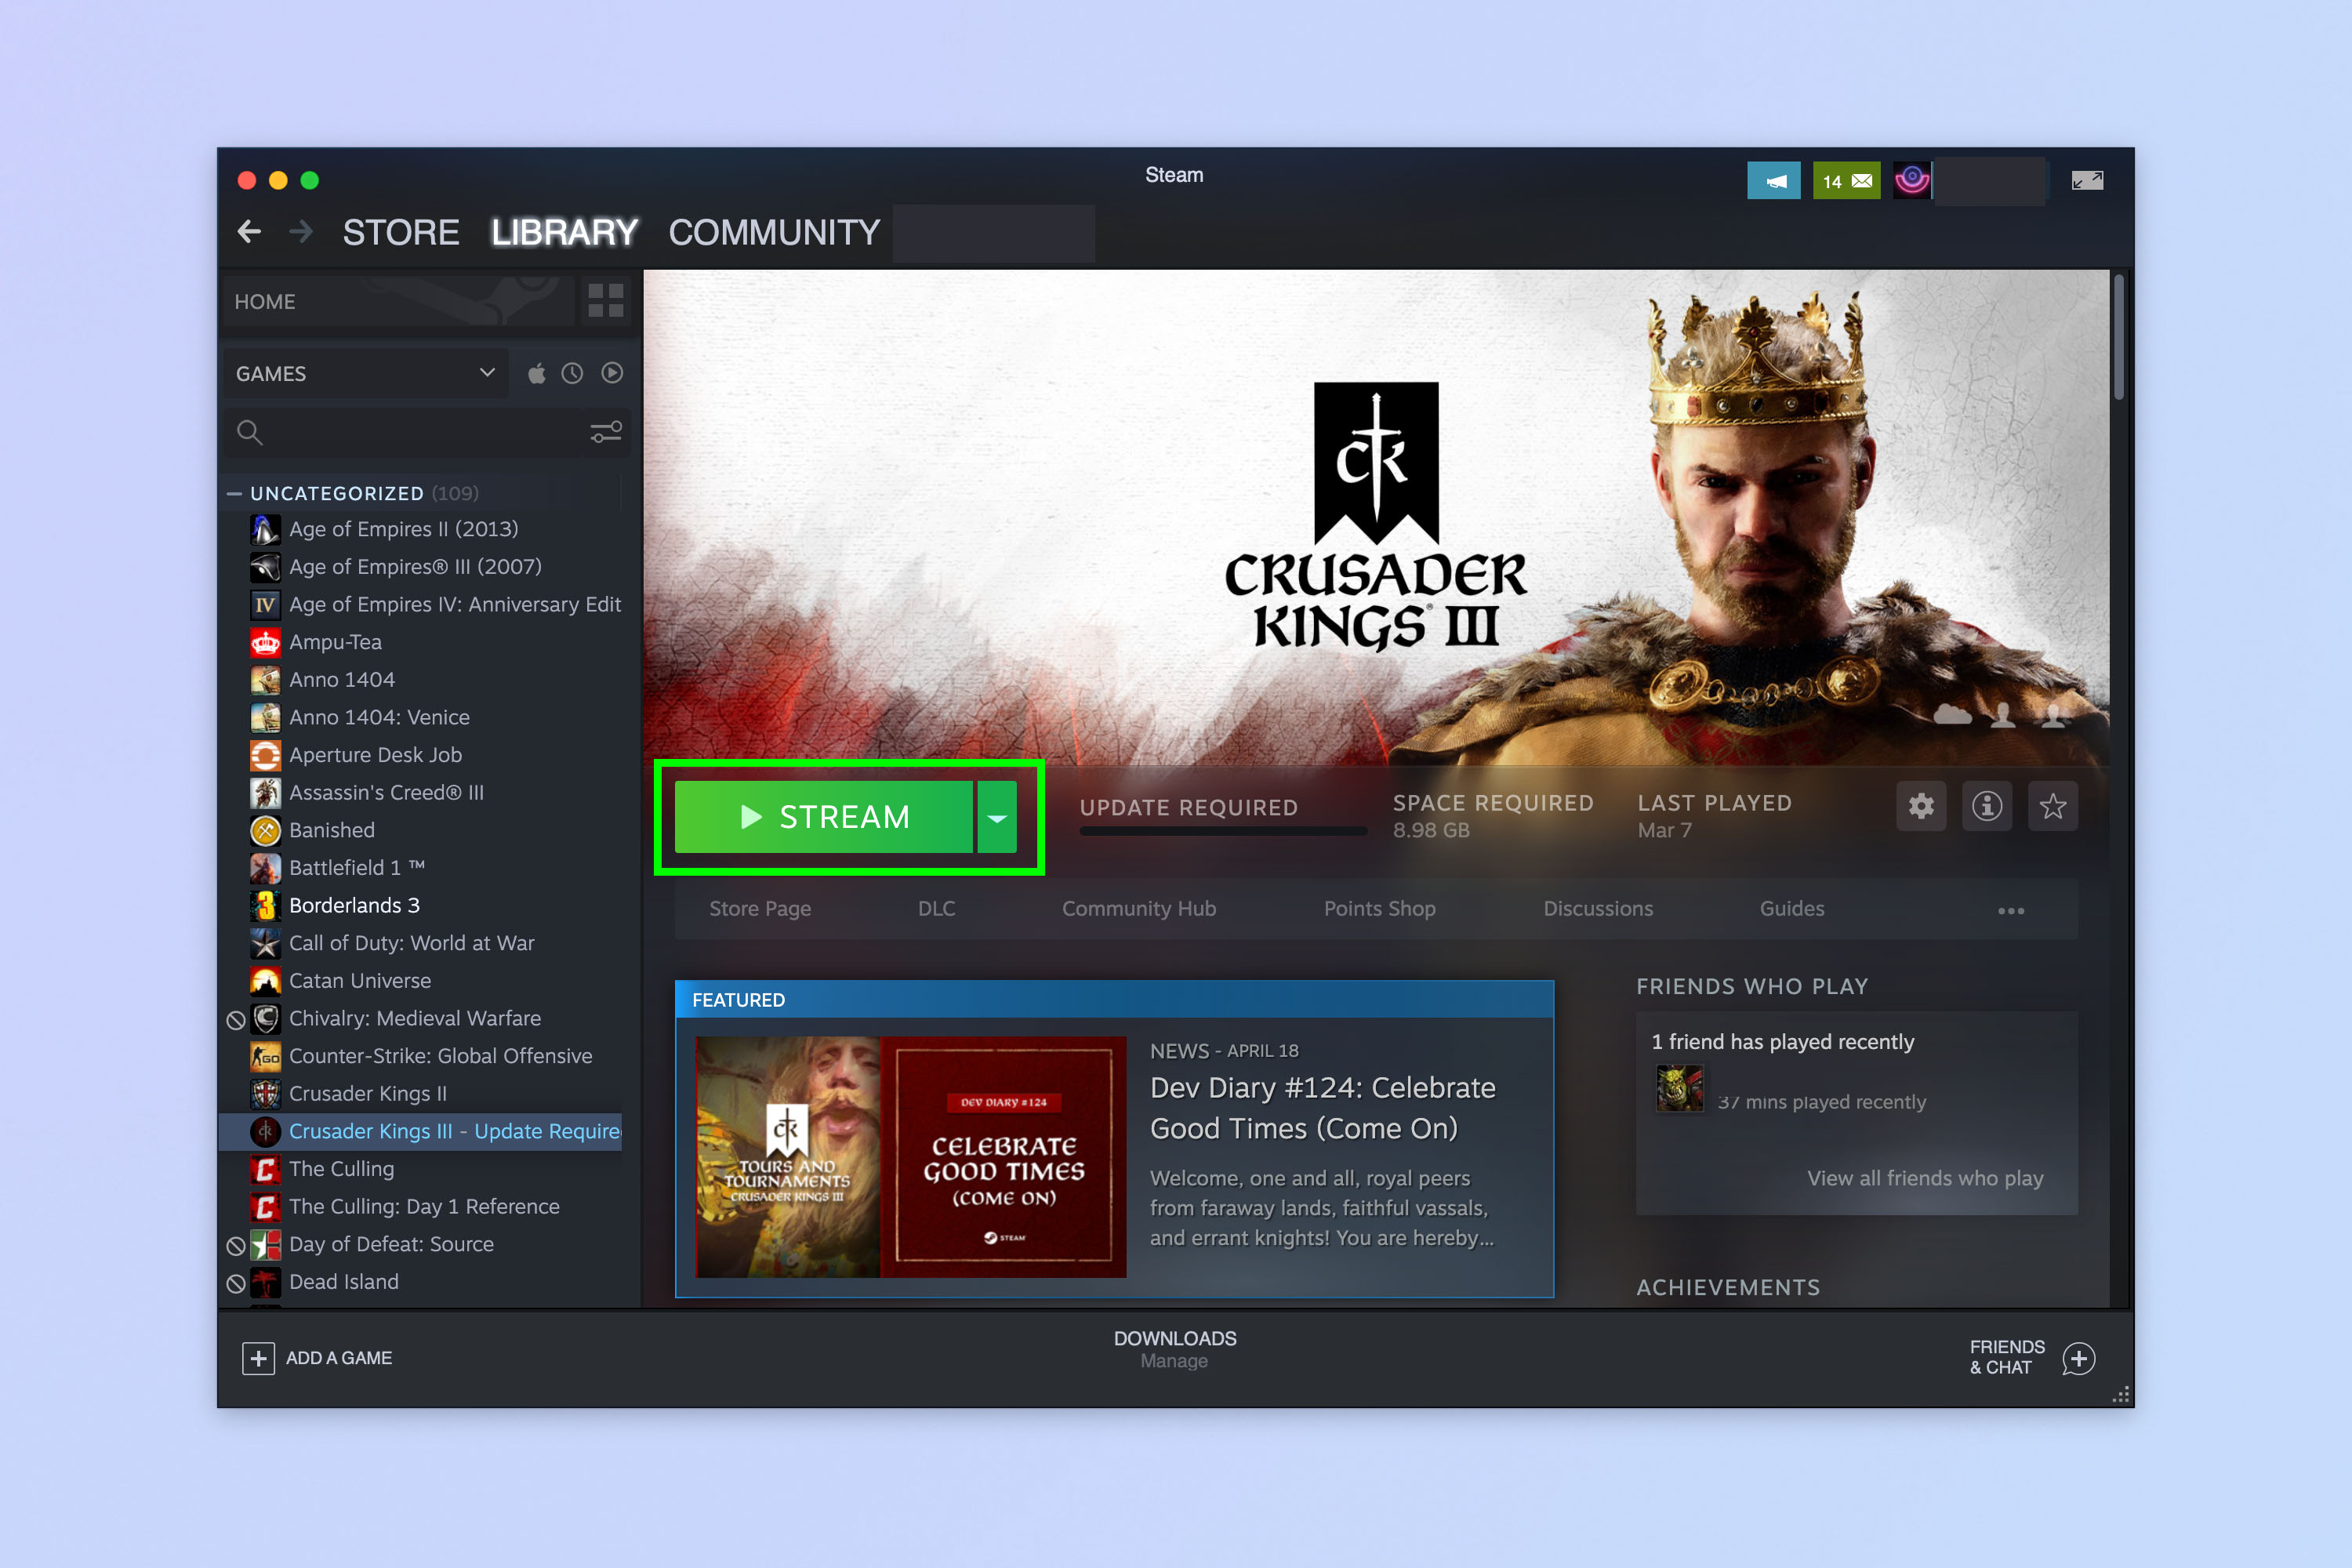
Remote play is one of my favorite Steam features. Using Remote Play, you can stream gameplay from one machine to another device. For example, if you have a laptop that can’t run many games, but you want to play games on the sofa away from your gaming PC, you can simply stream the game from your PC to your laptop. Your PC is actually running the game, but you’re viewing it on your laptop screen and inputting controls via your laptop. It’s incredibly useful. First, though, you have to enable Remote Play in settings!
Note: you have to be logged into the same Steam account on both devices, and a strong Wi-Fi connection on both is absolutely necessary for decent gameplay (investing in one of the best mesh Wi-Fi systems should help with that).
1. Open Settings and click Remote Play.
2. Click the Enable Remote Play check box.
3. To run a game, open Steam on another device, go to a game in your library which is installed on the machine you want to run the game on. Click Stream (this appears where you’d normally see “Play”).
5. Change which window appears on startup
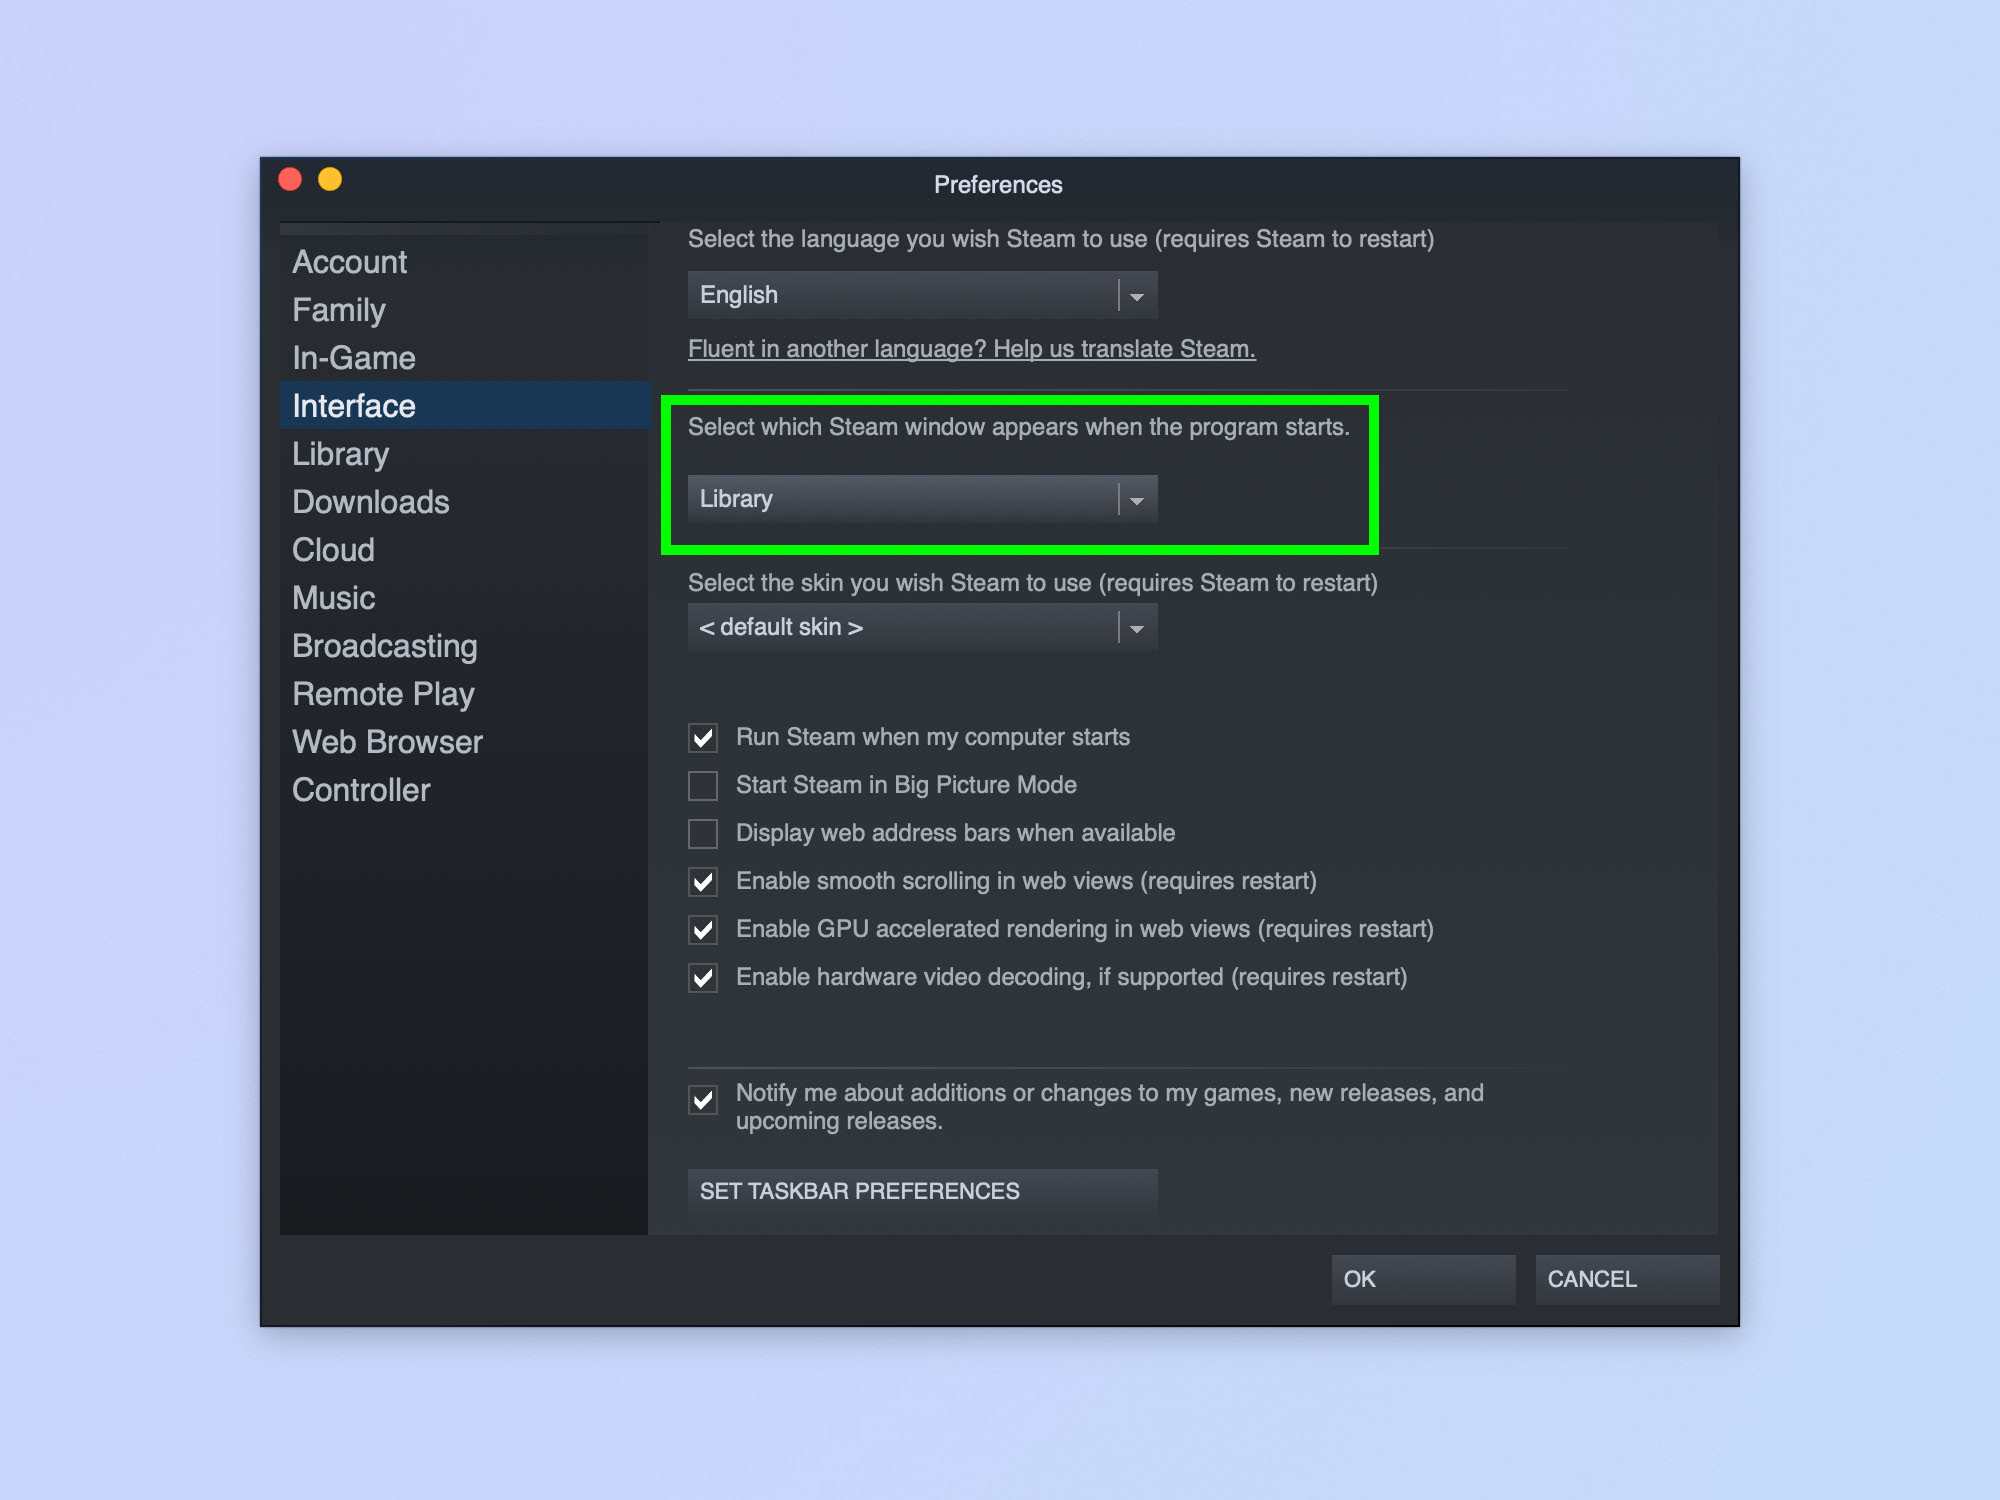
Most of the time, when I open Steam, it’s to play a game. Then, I’ll decide later to have a browse of the Store to see if there’s anything on sale or anything that looks interesting. So, personally, I find it a bit annoying that by default Steam opens to the Store page rather than the Library. Happily, remedying this and changing the startup page to the Library is a quick fix.
1. Open Settings/Preferences and click Library.
2. Click the dropdown box under ‘Select which Steam window appears when the program starts’.
3. Select a window, e.g. Library.
6. Customize Friend notifications
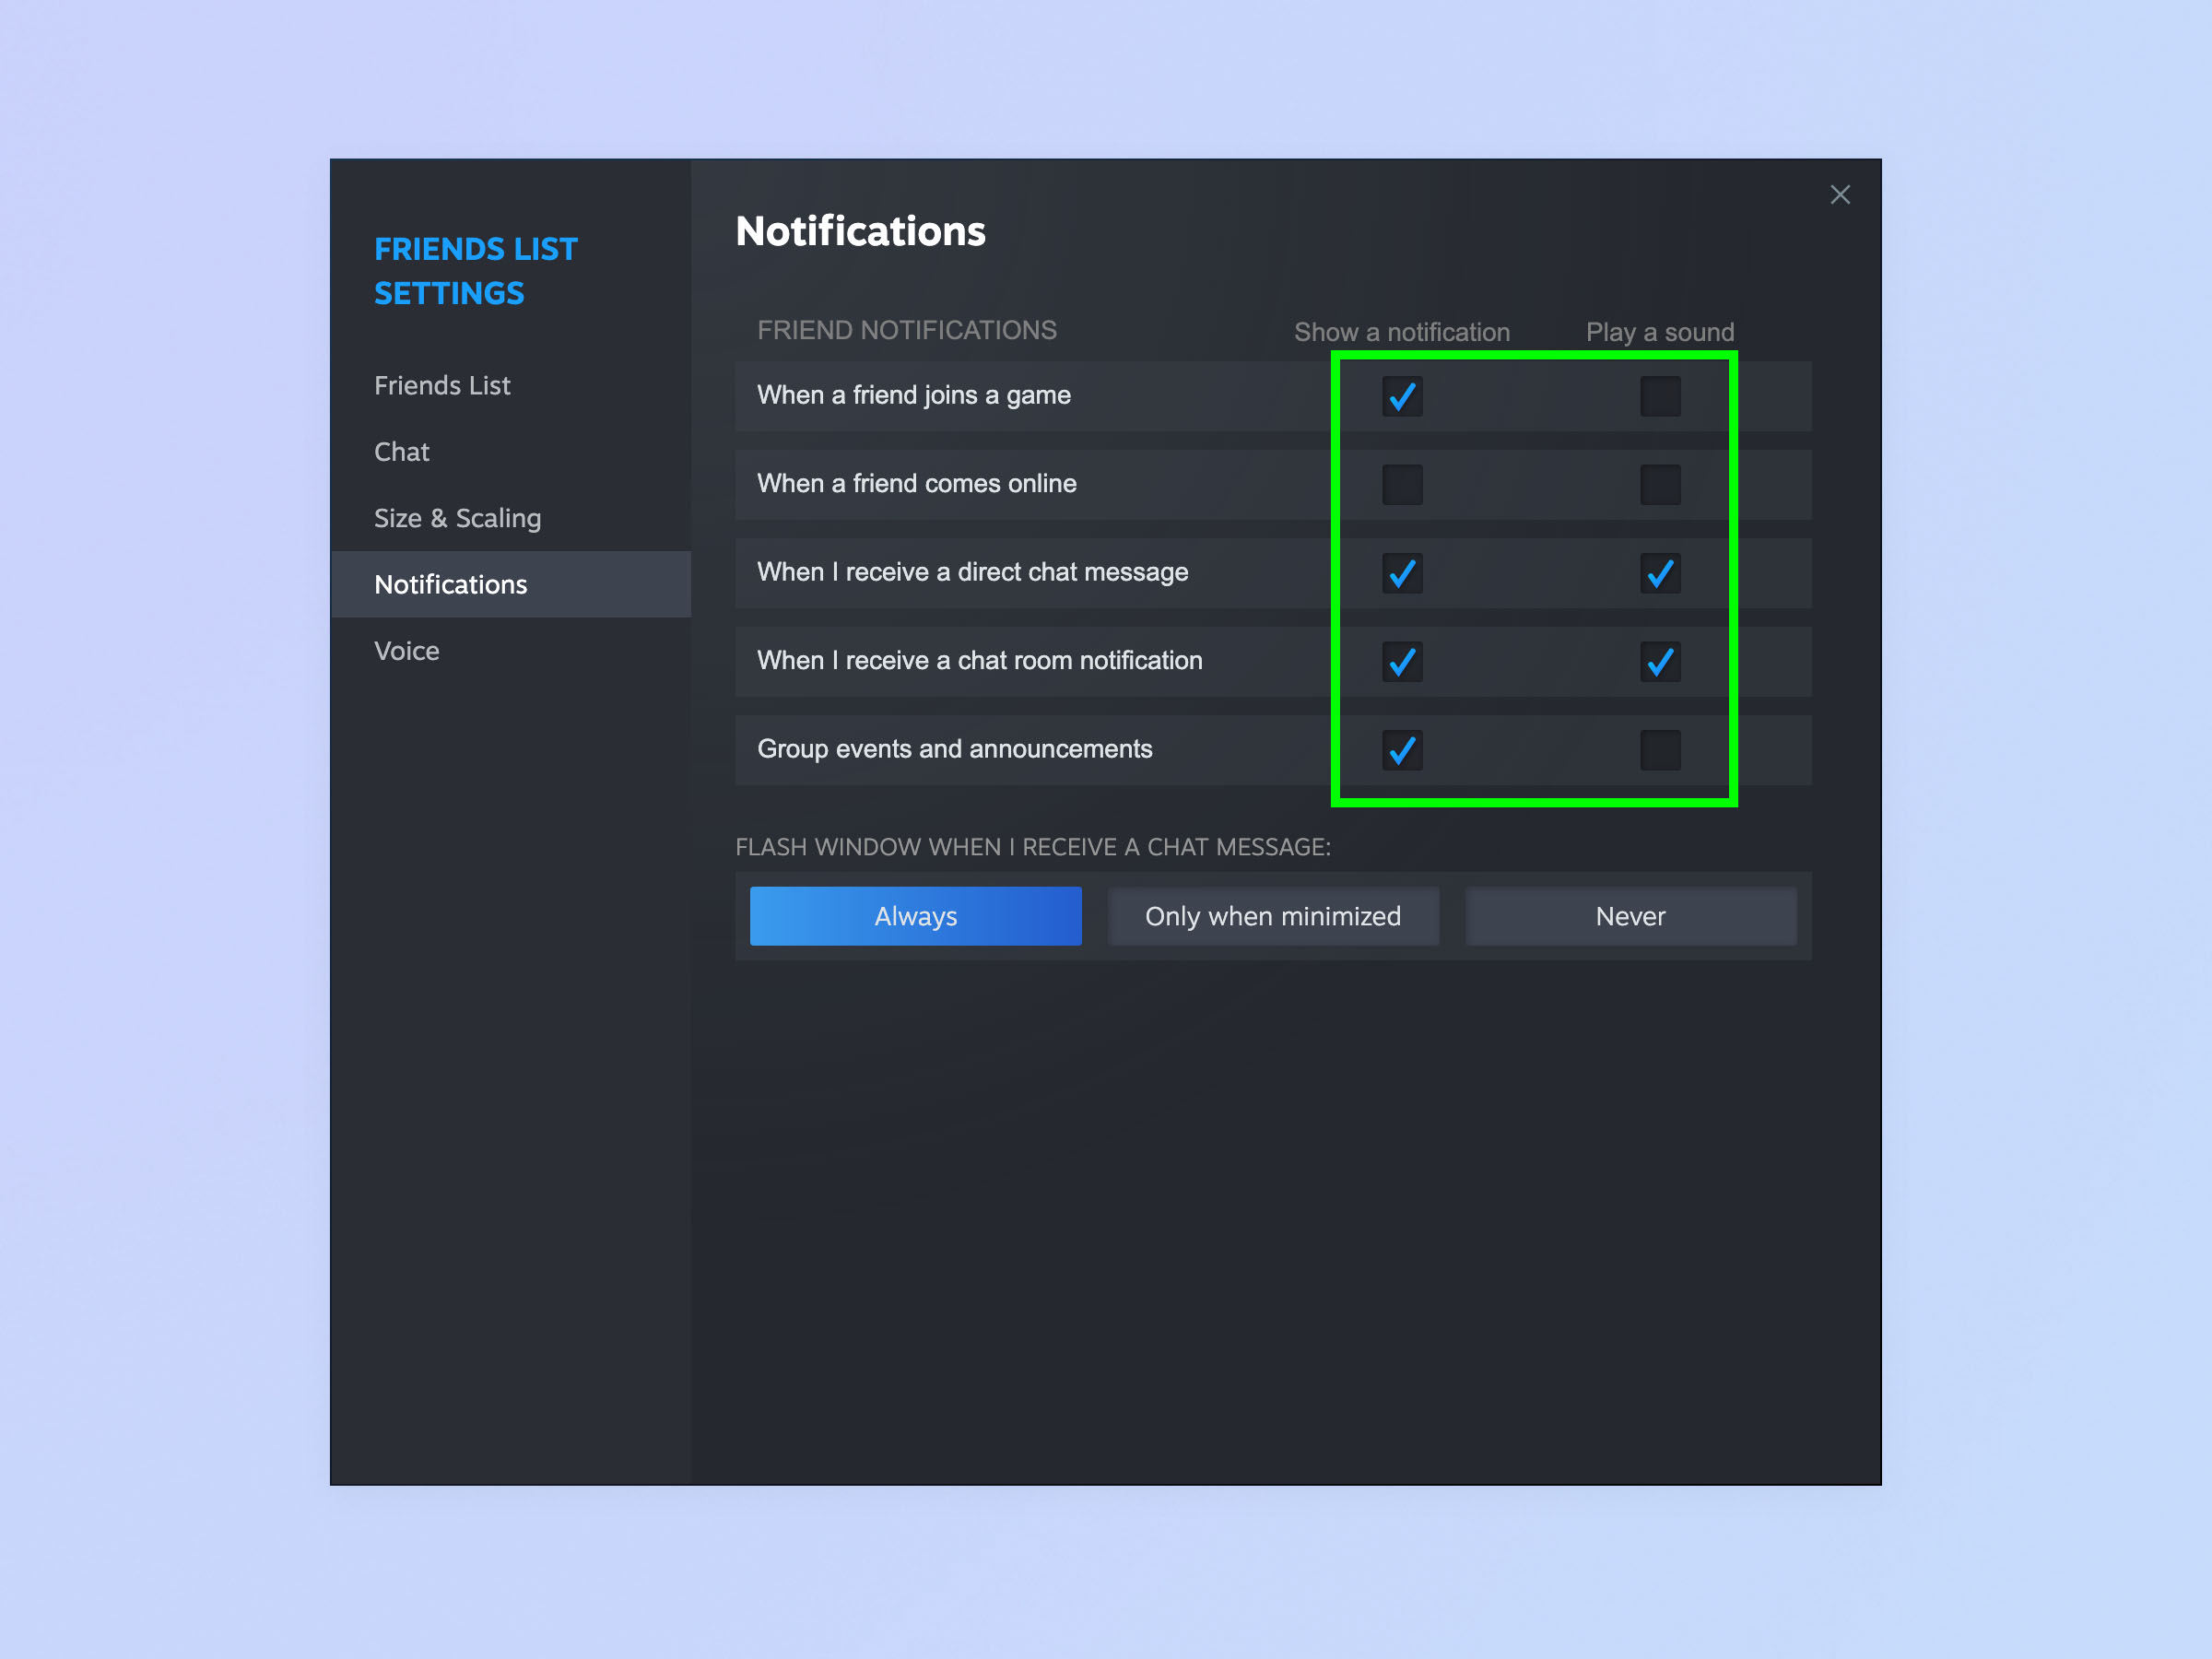
Friend notifications are pop ups and sounds that tell you when one of your Steam friends has come online or joins a game. You’ll also get friend notifications when you receive a chat message or there’s a group announcement for a group you’re part of. These can be annoying, especially if you have lots of Steam friends, meaning lots of activity, and/or you’re playing an immersive game.
By default, notifications aren’t enabled for when a Friend comes online, but they are enabled when a friend starts playing a game — which happens almost as frequently. Customizing these notifications is easy, if you know where to look.
1. Click Friends & Chat, bottom right of the Steam window.
2. The Friends List will pop up. Click the settings cog, top right of the Friends List.
3. Click Notifications and then click the check boxes as desired.
7. Change the screenshot shortcut and save location
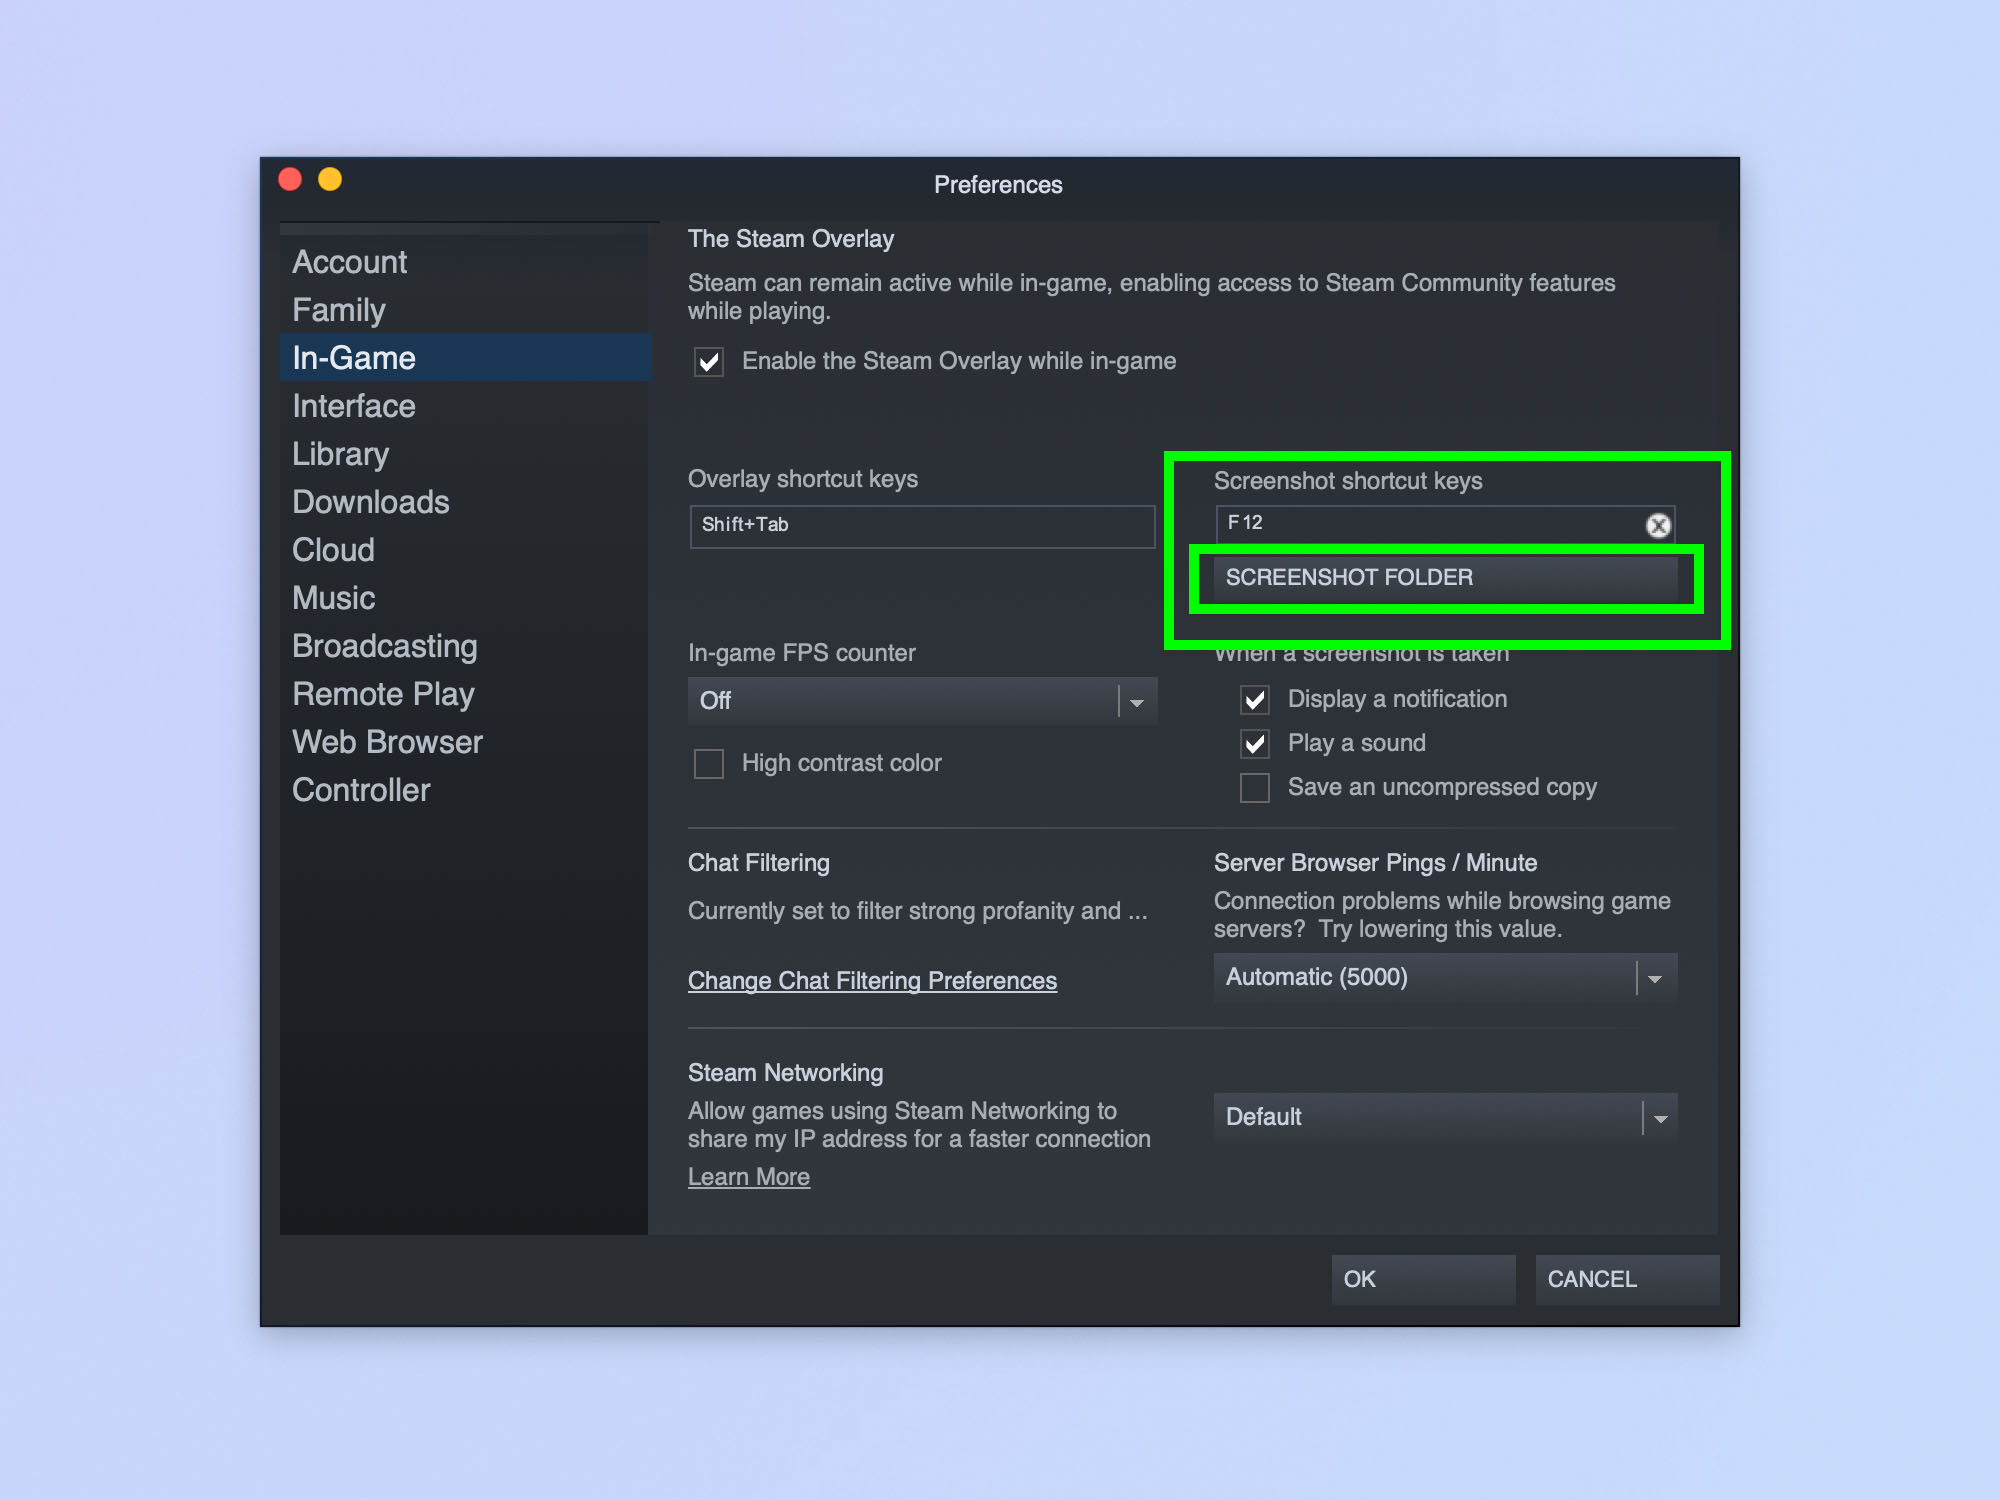
The standard Steam screenshots folder can be pretty tricky to find first time around, buried within your /steamapps folder within program files. If nobody told you the screenshots were there, you’d find it difficult to find any screenshots taken while gaming. As you may have guessed, though, you can change this location pretty easily. While you’re there, you might also want to change the screenshot keyboard shortcut, which is F12 by default. I’ve found that in certain games which use the function buttons a lot, I sometimes knock the screenshot key and take a screen grab. We’ll show you how to do that, too.
1. Open Settings/Preferences and click In-Game.
2. Click the Screenshot Folder button and select a new folder location.
3. Click the box underneath Screenshot shortcut keys and press the key you want assigned to the screenshot function.
There you have it. You’re now hopefully armed with a few tricks up you sleeve to make Steam act the way you want it to. If you’d like to read more Steam tutorials, we can show you how to get a refund on Steam, how to appear offline on Steam and how to play Steam games on a Chromebook.
We also have Steam Deck tutorials, including how to take a screenshot on Steam Deck, how to bring up the keyboard on Steam Deck and how to enable Desktop Mode on Steam Deck.
For all the latest Technology News Click Here
For the latest news and updates, follow us on Google News.
