How to set up a Chromebook
So you need to know how to set up a Chromebook because you just bought one of our best Chromebooks. That’s great! Chromebooks are a great choice because they’re relatively inexpensive but can still handle a ton of tasks from email to streaming the latest shows and movies and even some basic mobile gaming. It’s what makes them a great choice for students or anyone on a budget.
They are also incredibly easy to set up. In just a few minutes you can go from pulling your Chromebook out of the box to using it to watch new Netflix movies or browsing the internet. All you need is to set up a Google account — or log into an existing one — and confirm a few settings. There’s no need to be a tech expert.
And if you already have a Chromebook and are setting up a second one, you don’t have to worry about getting everything just right. Your Google account can sync with your new device and have everything looking just the way you like it. So without further ado, here are all the steps you need to know on how to set up your Chromebook.
How to set up a Chromebook
- Turn on your Chromebook and click Get started
- Connect to your Wi-Fi network
- Set up your profile
- Log in to your Google account
- Accept the Terms and conditions
- Sync your Chromebook settings
- Create a login PIN
- Set up Google Assistant
- Personalize your display theme
Read on to see detailed instructions for each step.
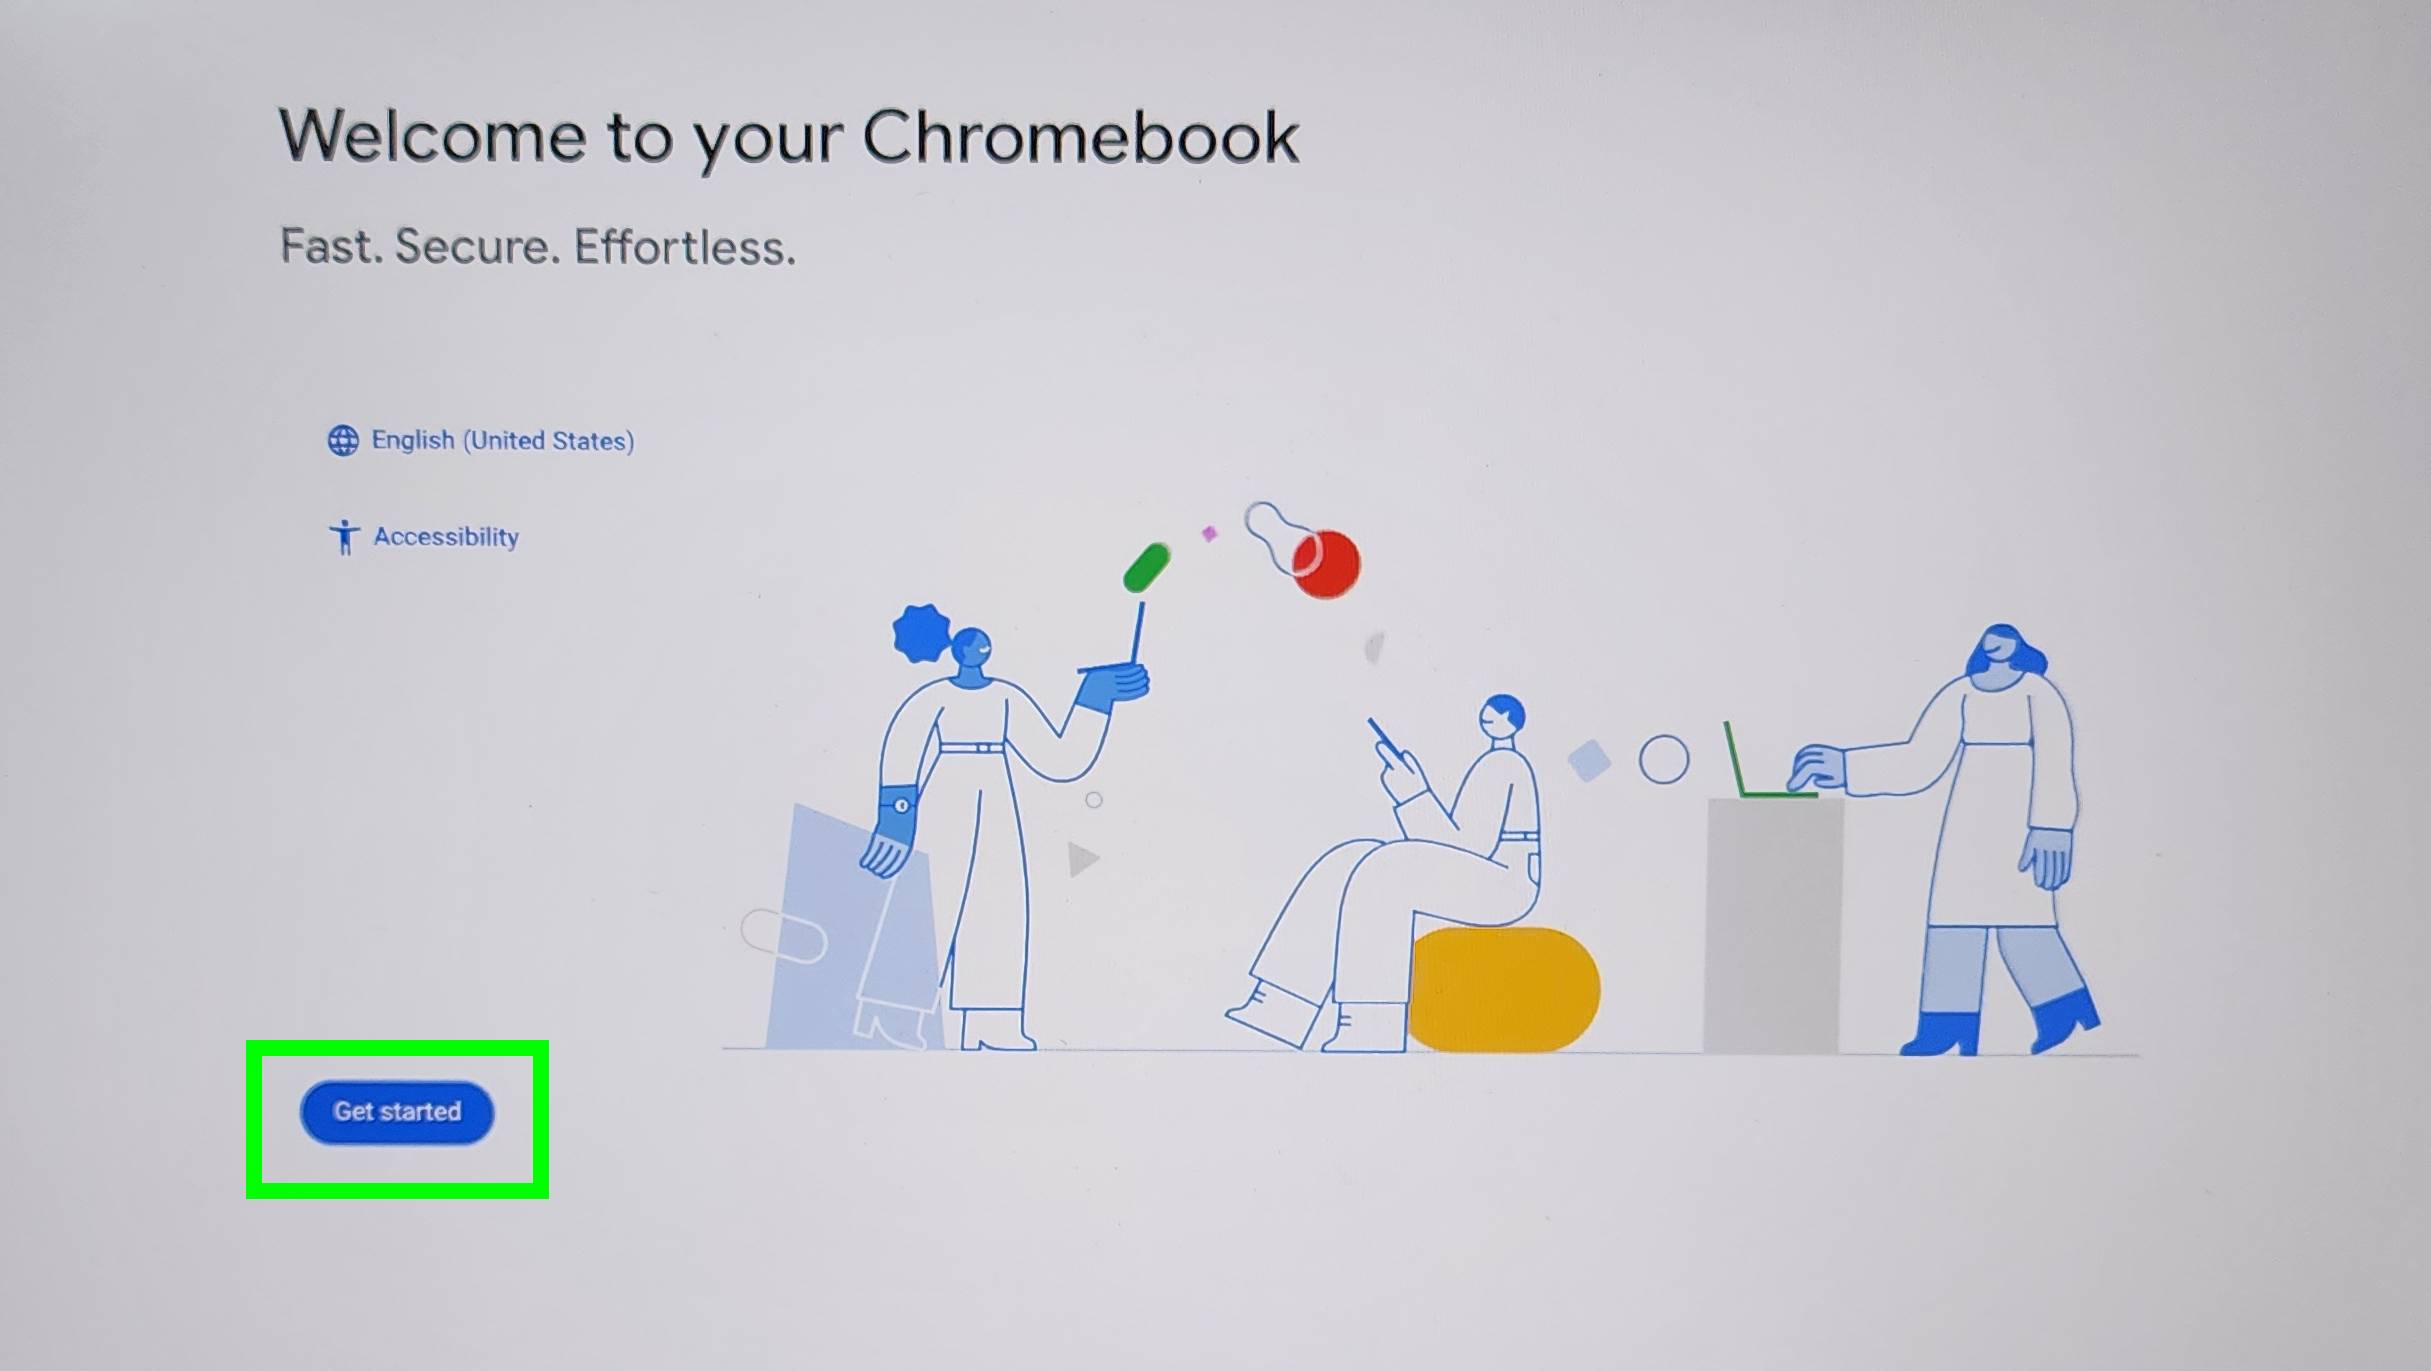
1. Turn on your Chromebook and click Get started
(Image: © Future)
First things first. To turn on your Chromebook press the power button. Then, once it has booted up, click Get started.
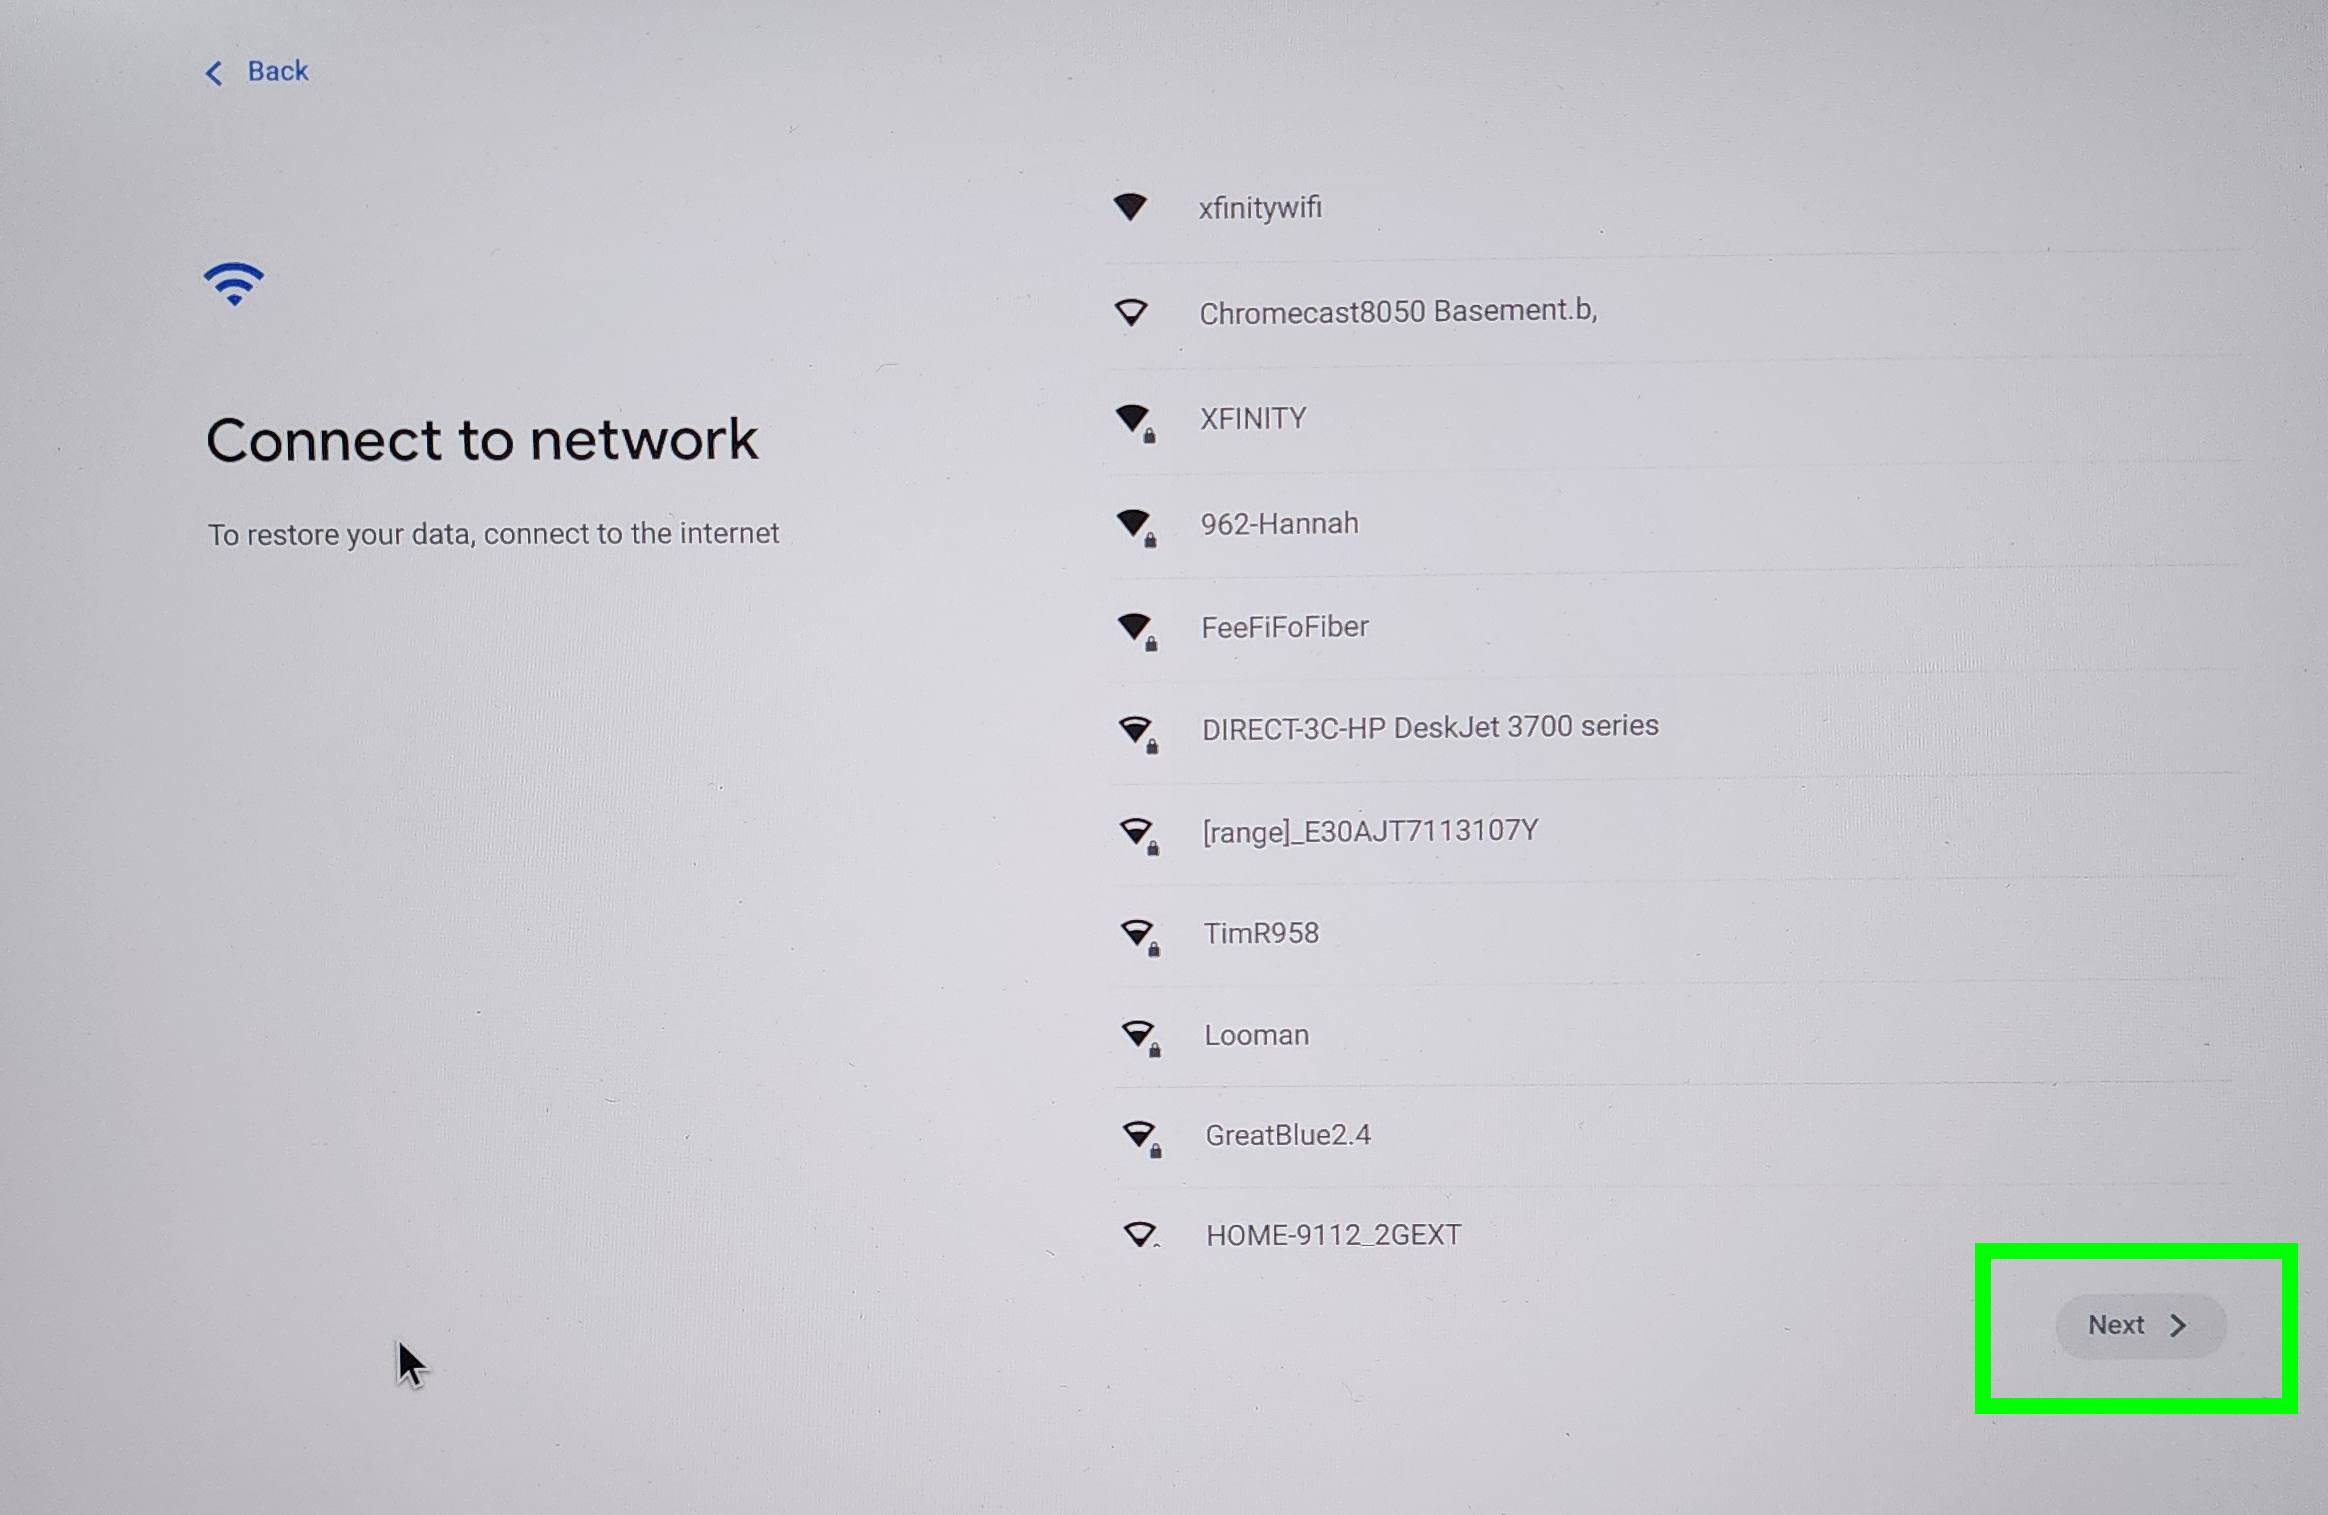
2. Connect to your Wi-Fi network
(Image: © Future)
Now it’s time to connect to your Wi-Fi network. Select your network and then click next. Then log in to your Wi-Fi network.
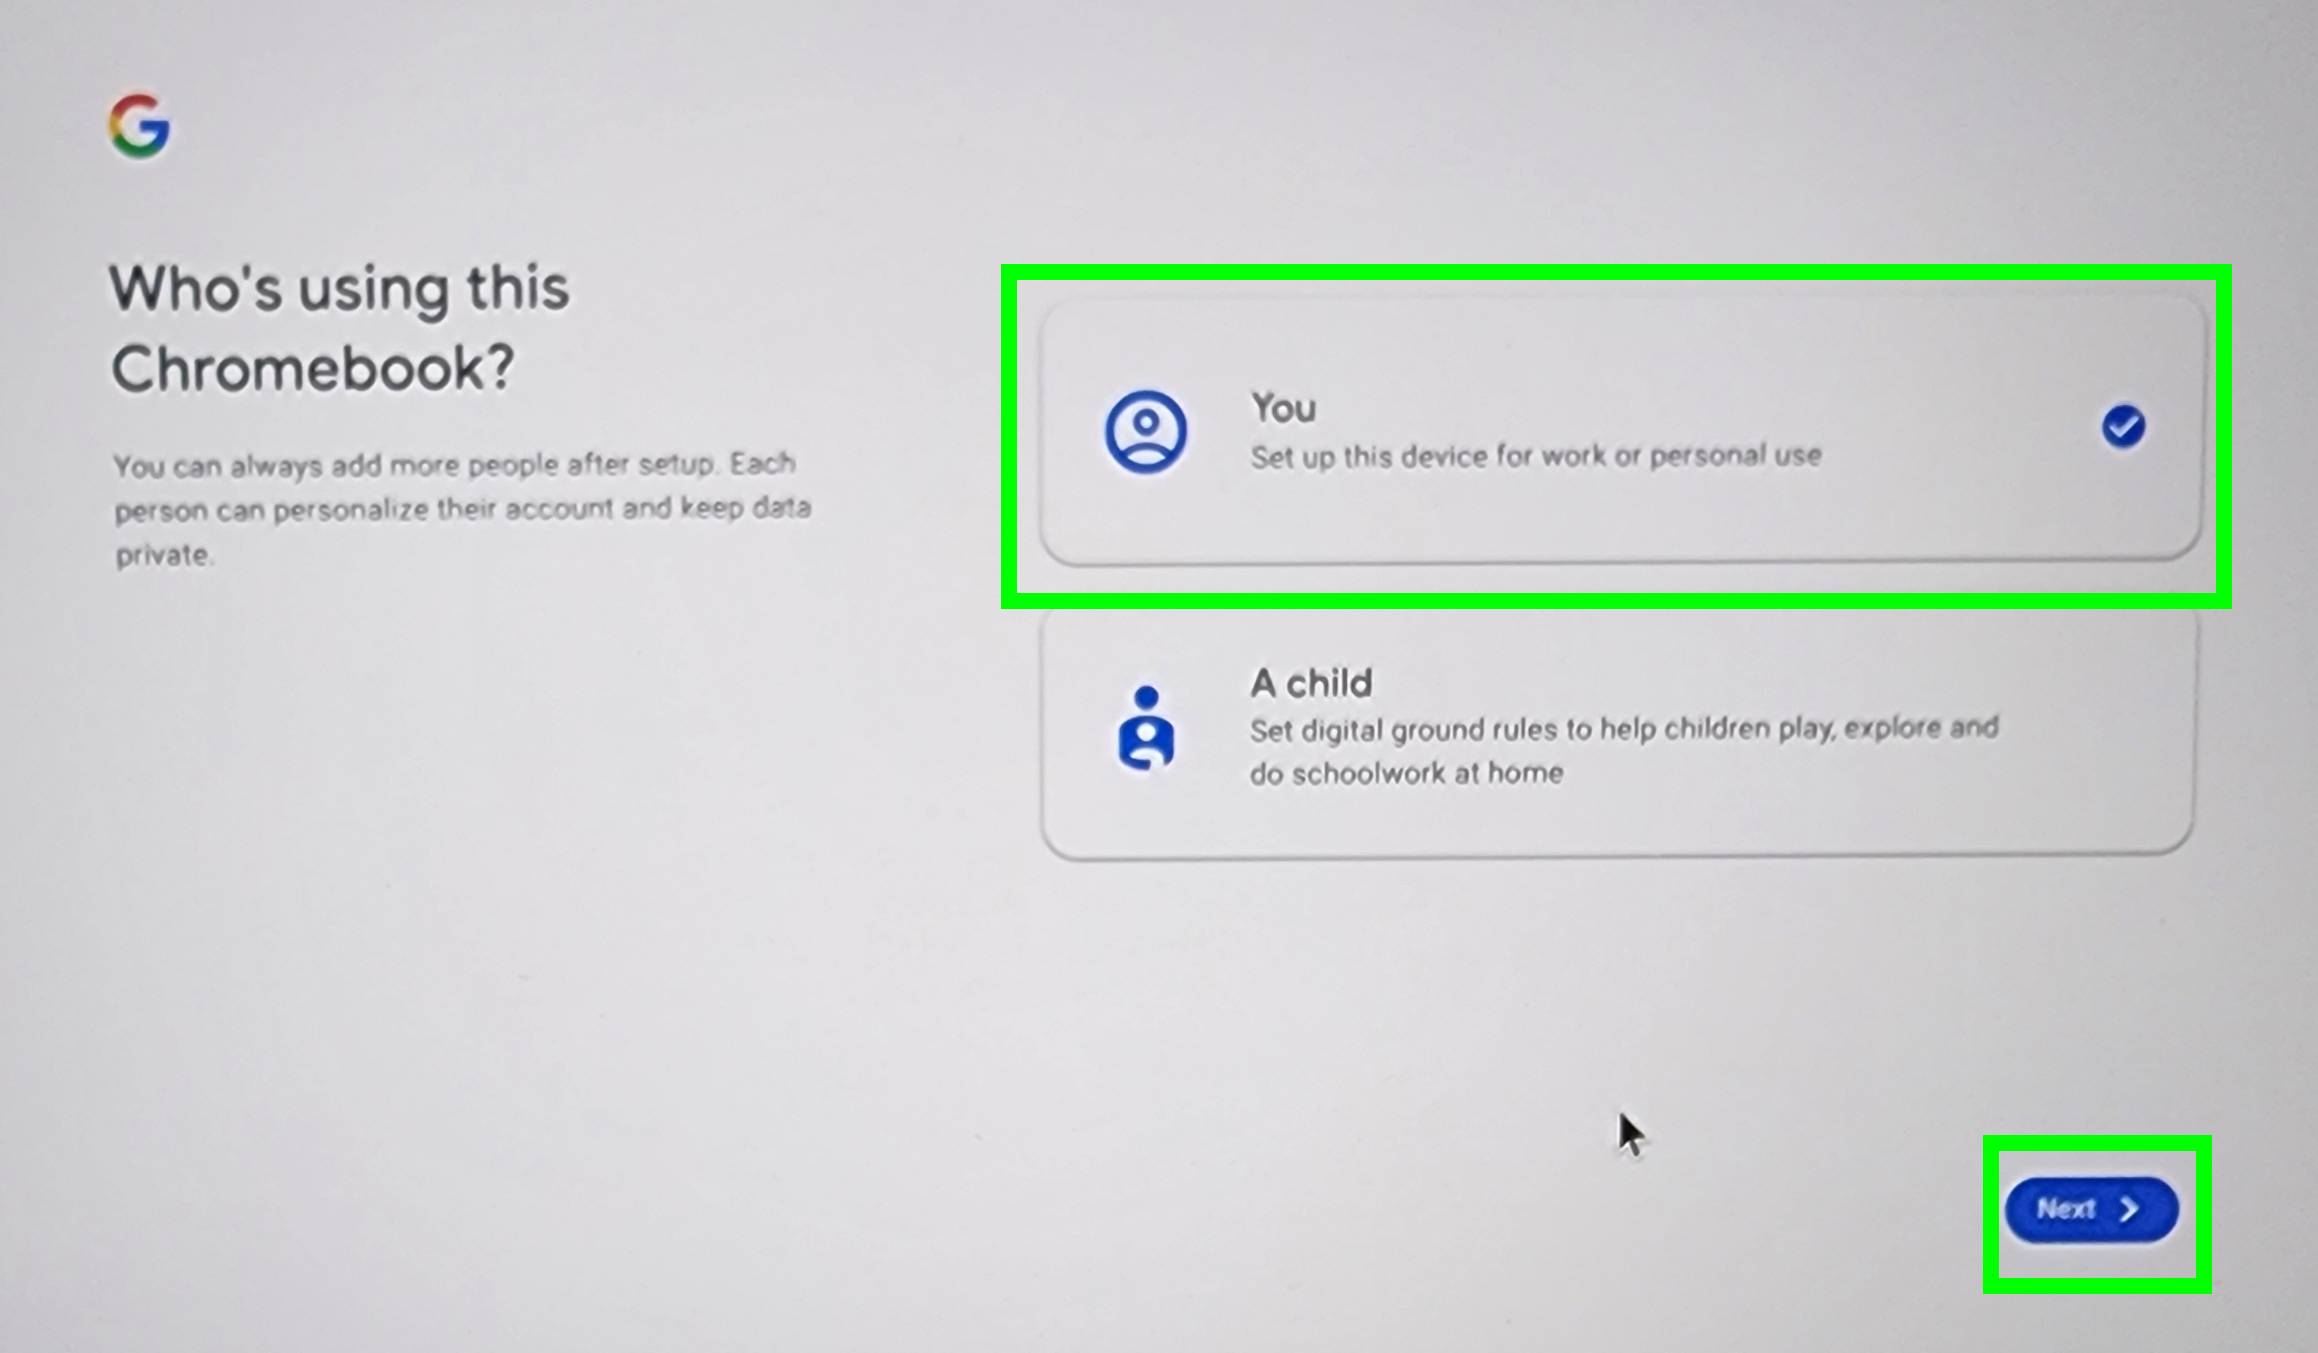
3. Set up your profile
(Image: © Future)
Once you are connected to your Wi-Fi network, you need to select who is using the profile. There is a “You” profile and also an “A child” profile that can be set up to set limits on your kid’s screen time and access.
For this guide, we are going to set up the profile for “You.” Select “You” then click Next.
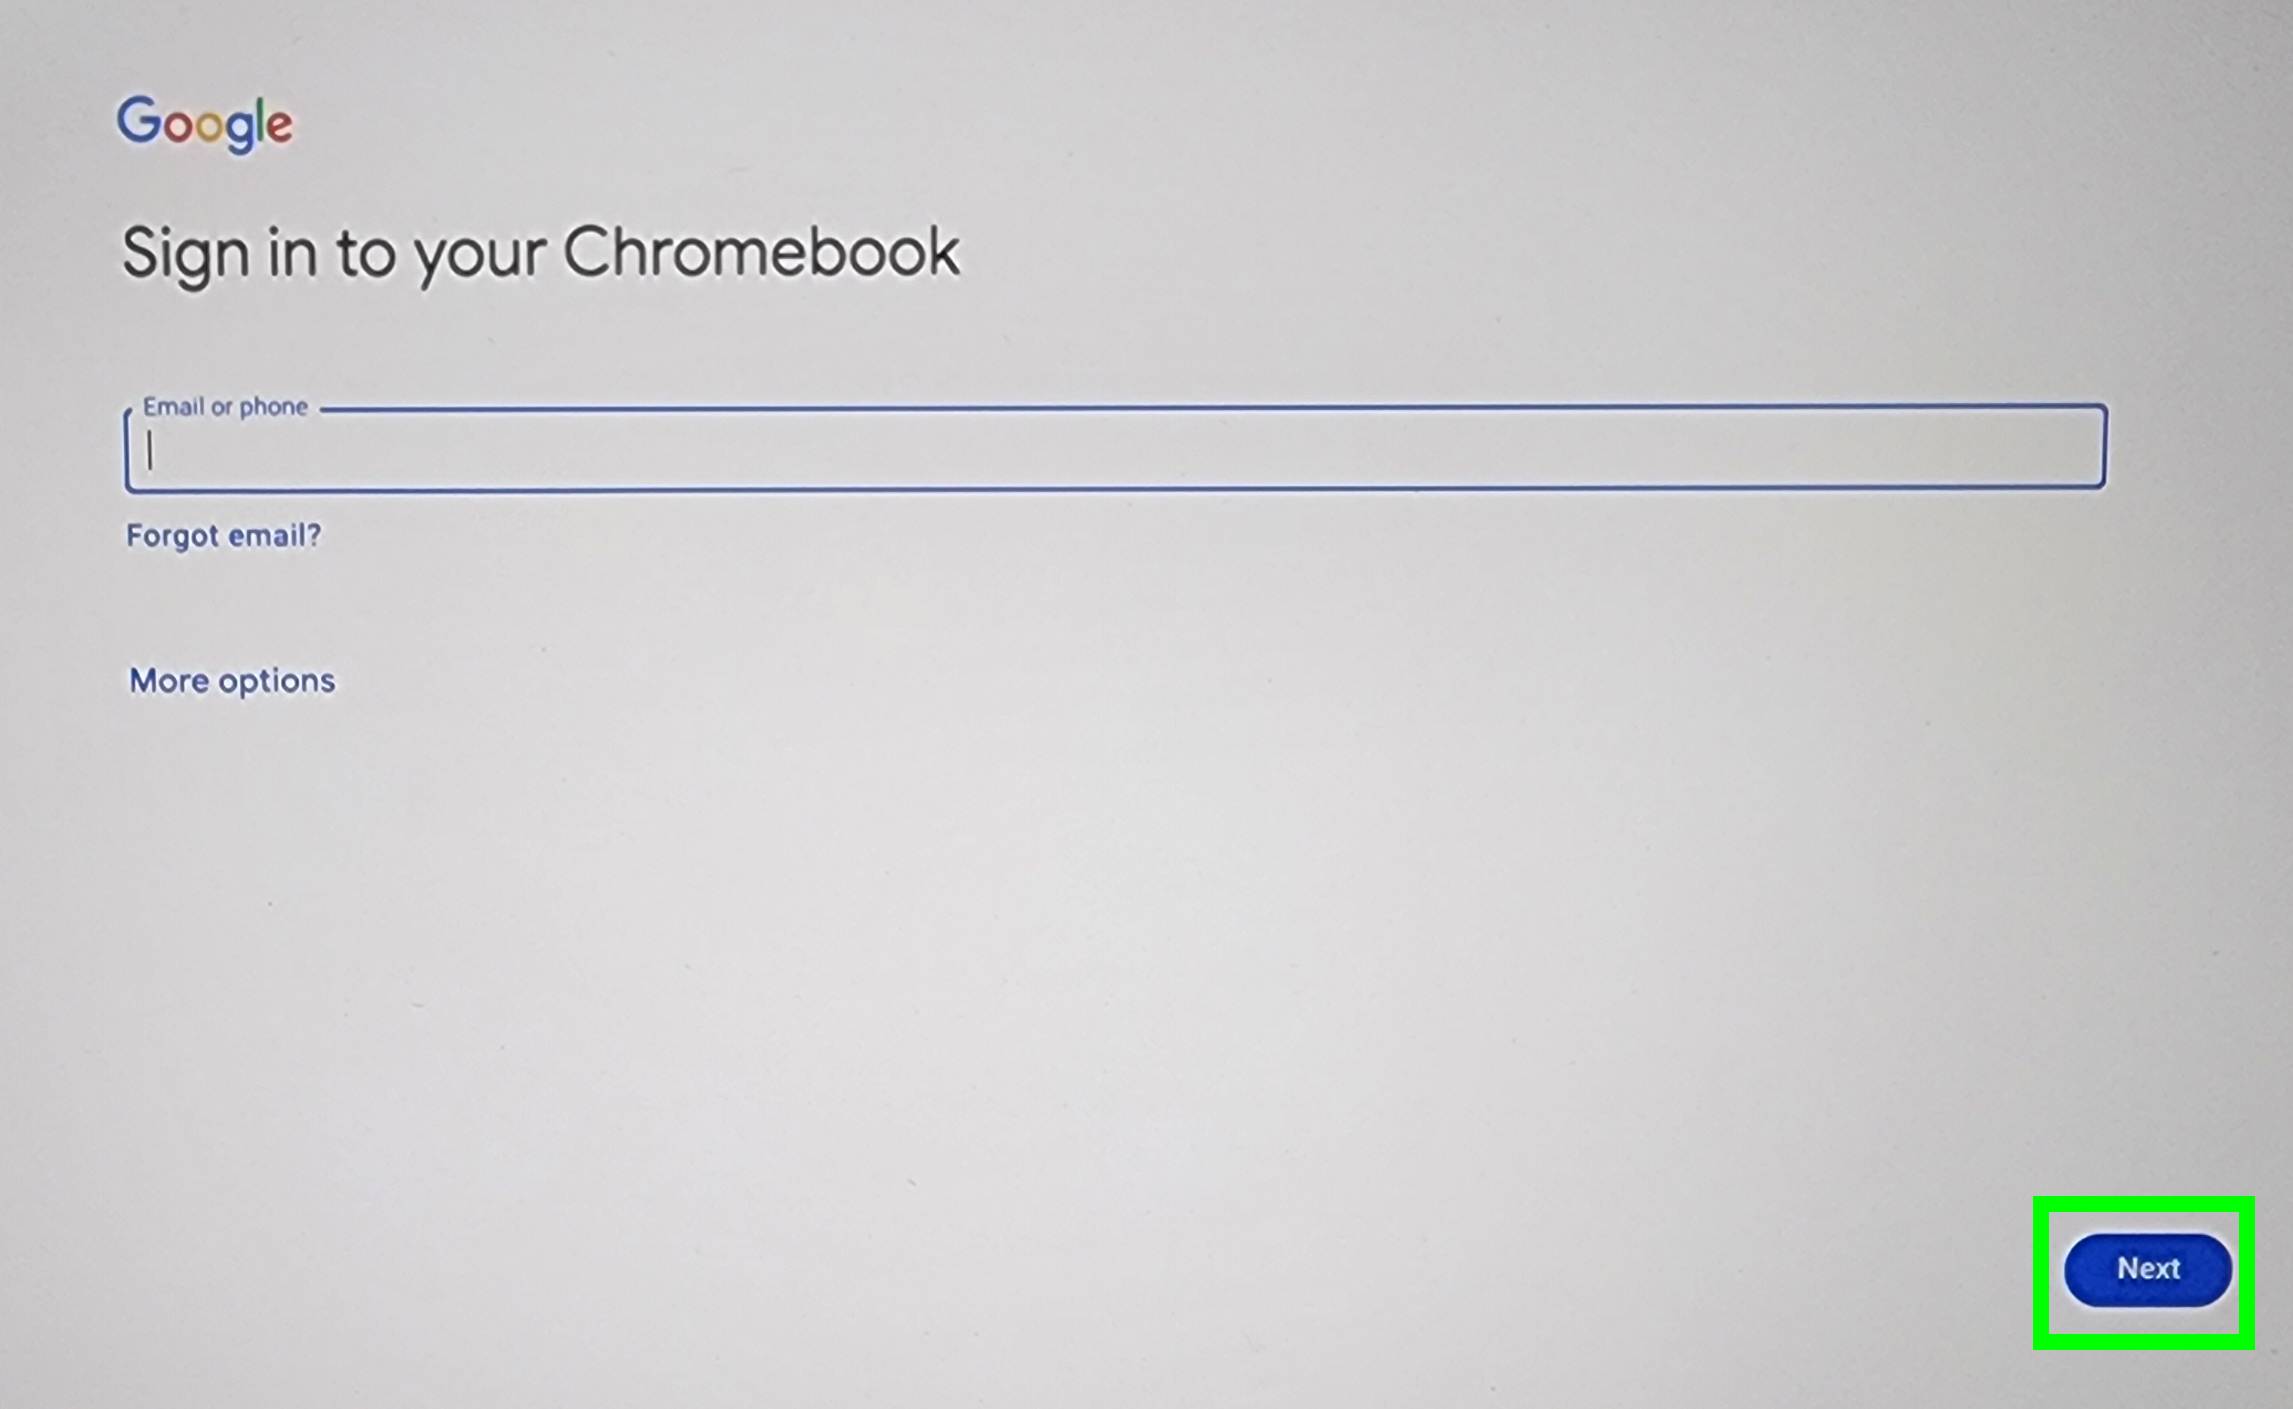
4. Log in to your Google account
(Image: © Future)
Next, you will need to log in to your Google account.
If you do not have a Google account, you can select more options and then select Create an account. You can also click an icon that looks like a person’s head and shoulders at the bottom left to browse as a guest.
For this guide, we are logging in with an existing account. First, type in your Google account email then click Next. This will take you to a screen where you will type in your Google account password and then click Next to complete logging in.
You also may need to complete two-factor authentication (2FA). This should only occur if you’ve already set up 2FA for your Google account. If you have set up 2FA, confirm the push notification on your phone to complete 2FA.
5. Accept the Terms and conditions
(Image: © Future)
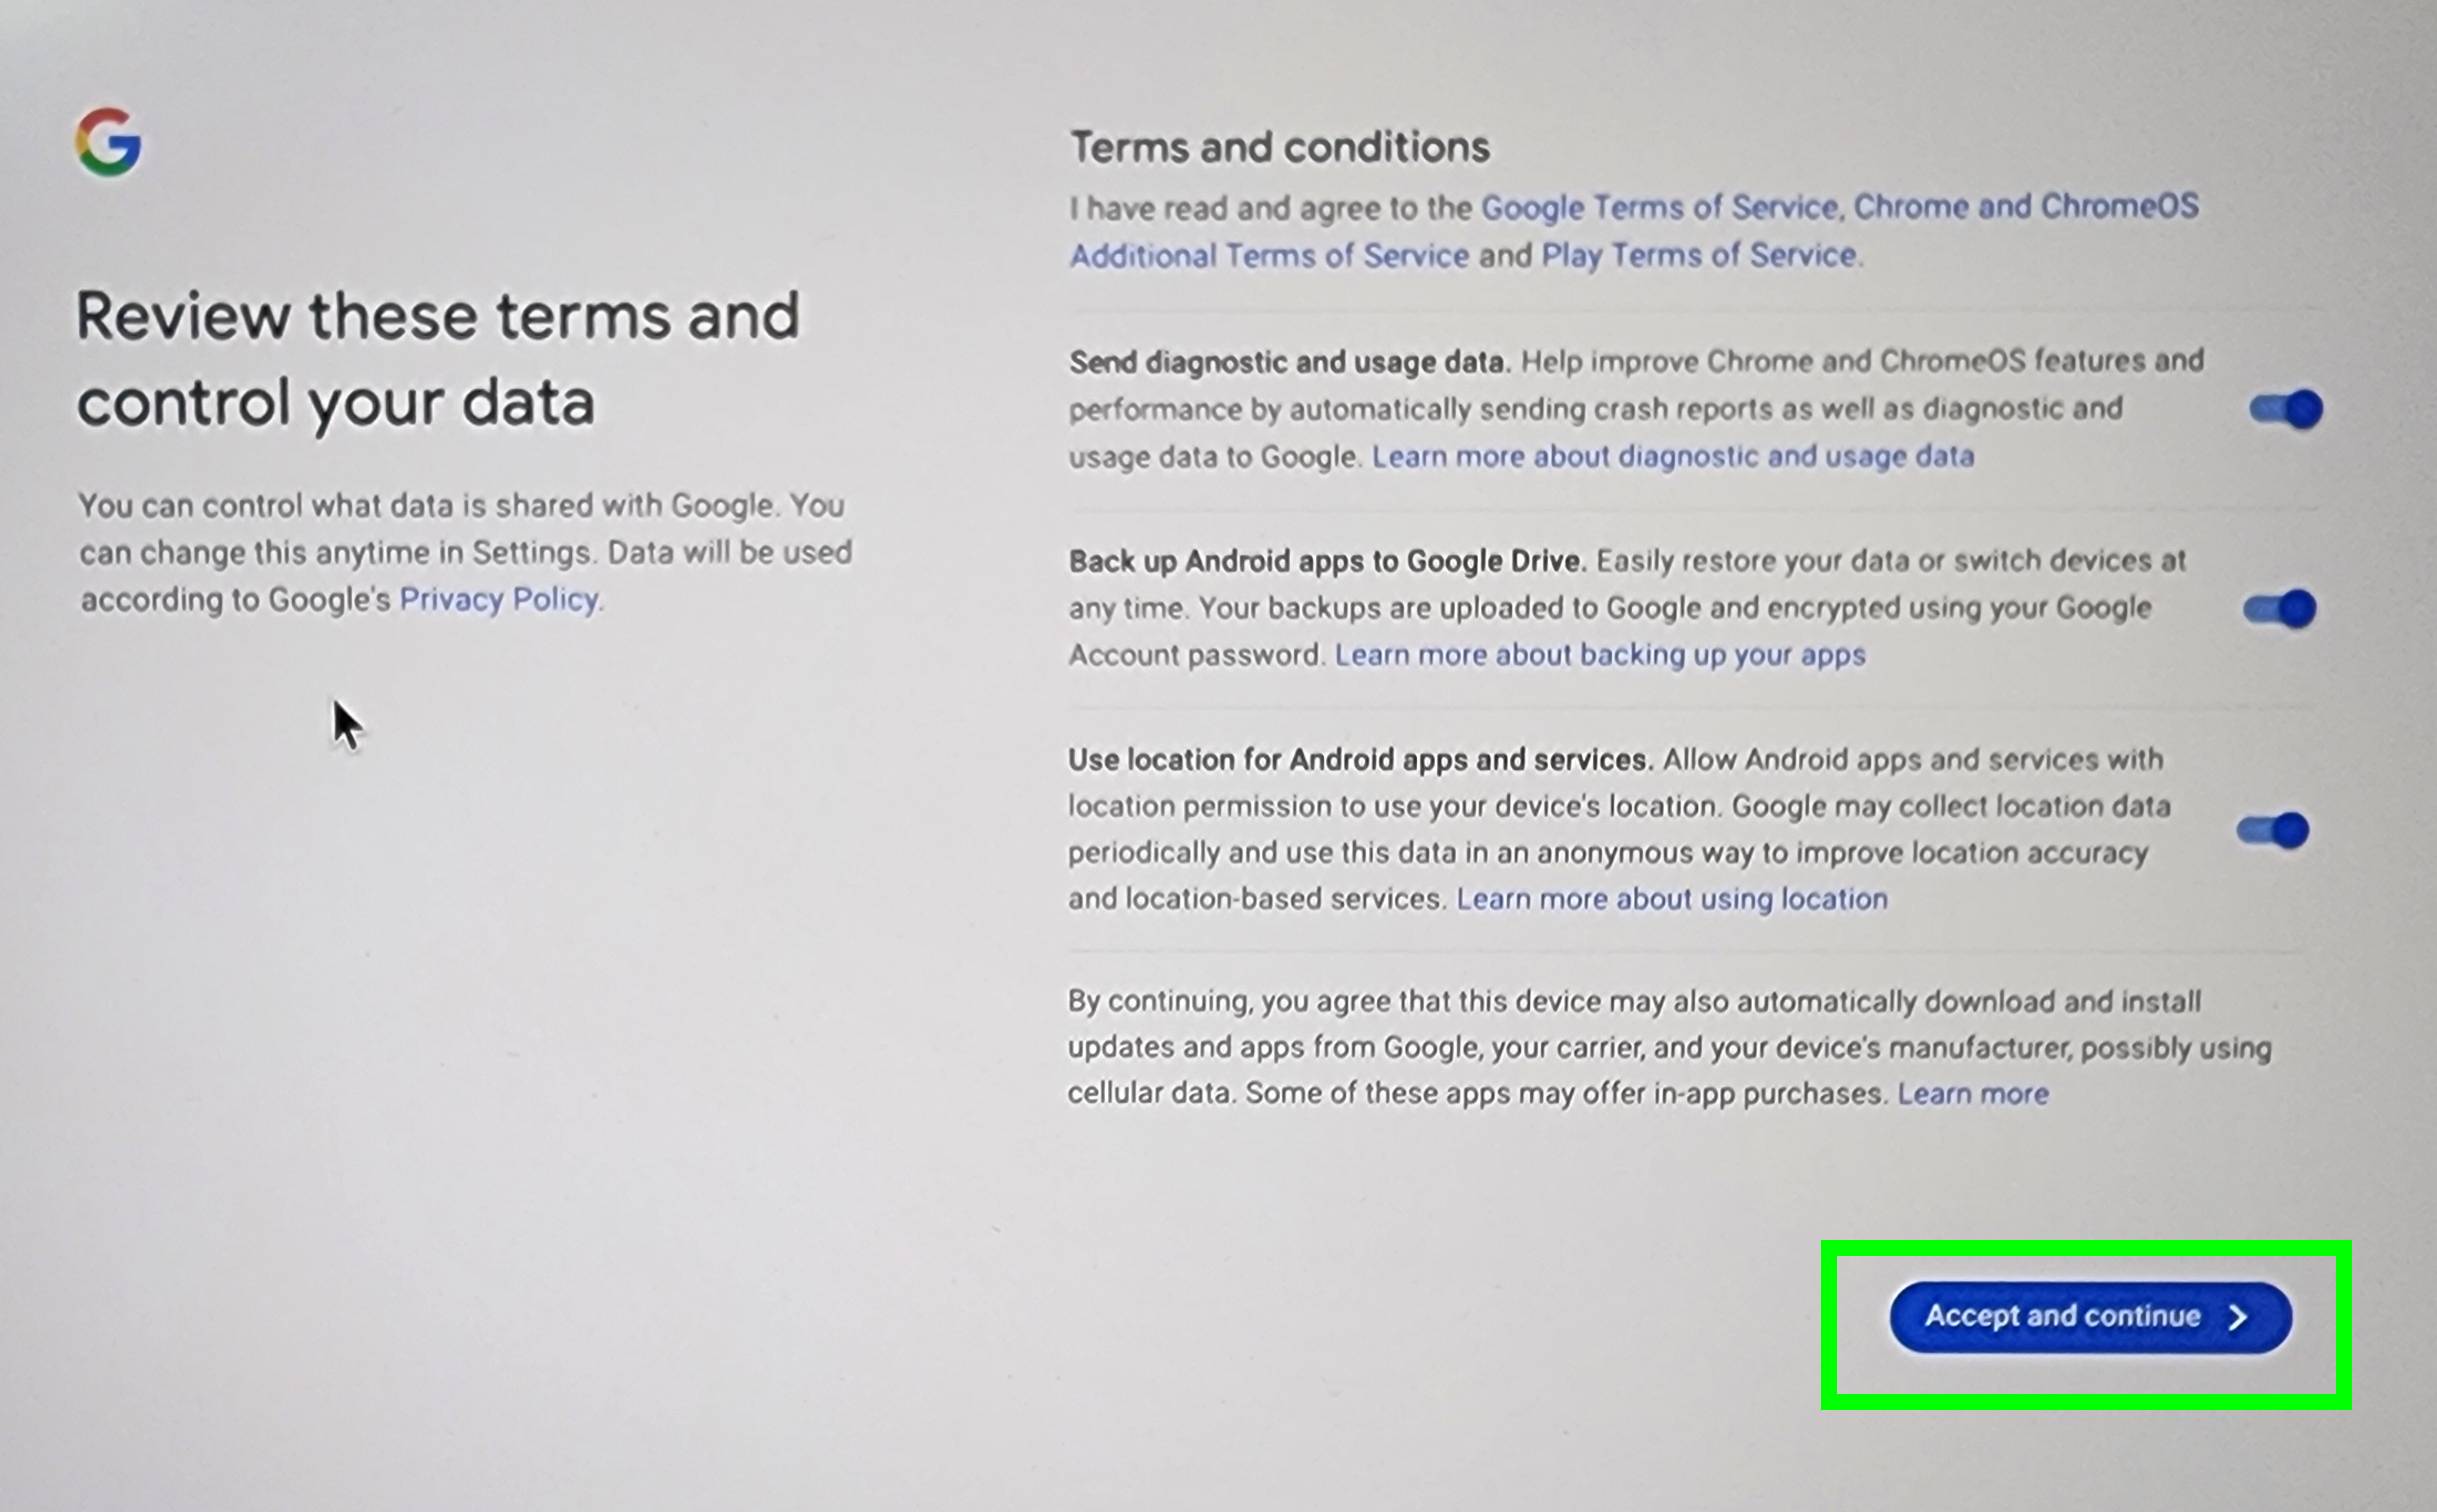
Now that you have logged into your Google account, you’ll need to accept the Chromebook’s Terms and conditions.
There are several settings you can turn off or on here: Send diagnostic and usage data, back up Android apps to Google Drive and use location for Android apps and services. You can select all of these or none of them, though selecting all may put your data and privacy at risk and selecting none may make it so you cannot use the full potential of your Chromebook. I personally deselect send diagnostic and usage data and leave the other two selected, but go with what you are comfortable with.
Select your desired settings then click Accept and continue.
6. Sync your Chromebook settings
(Image: © Future)
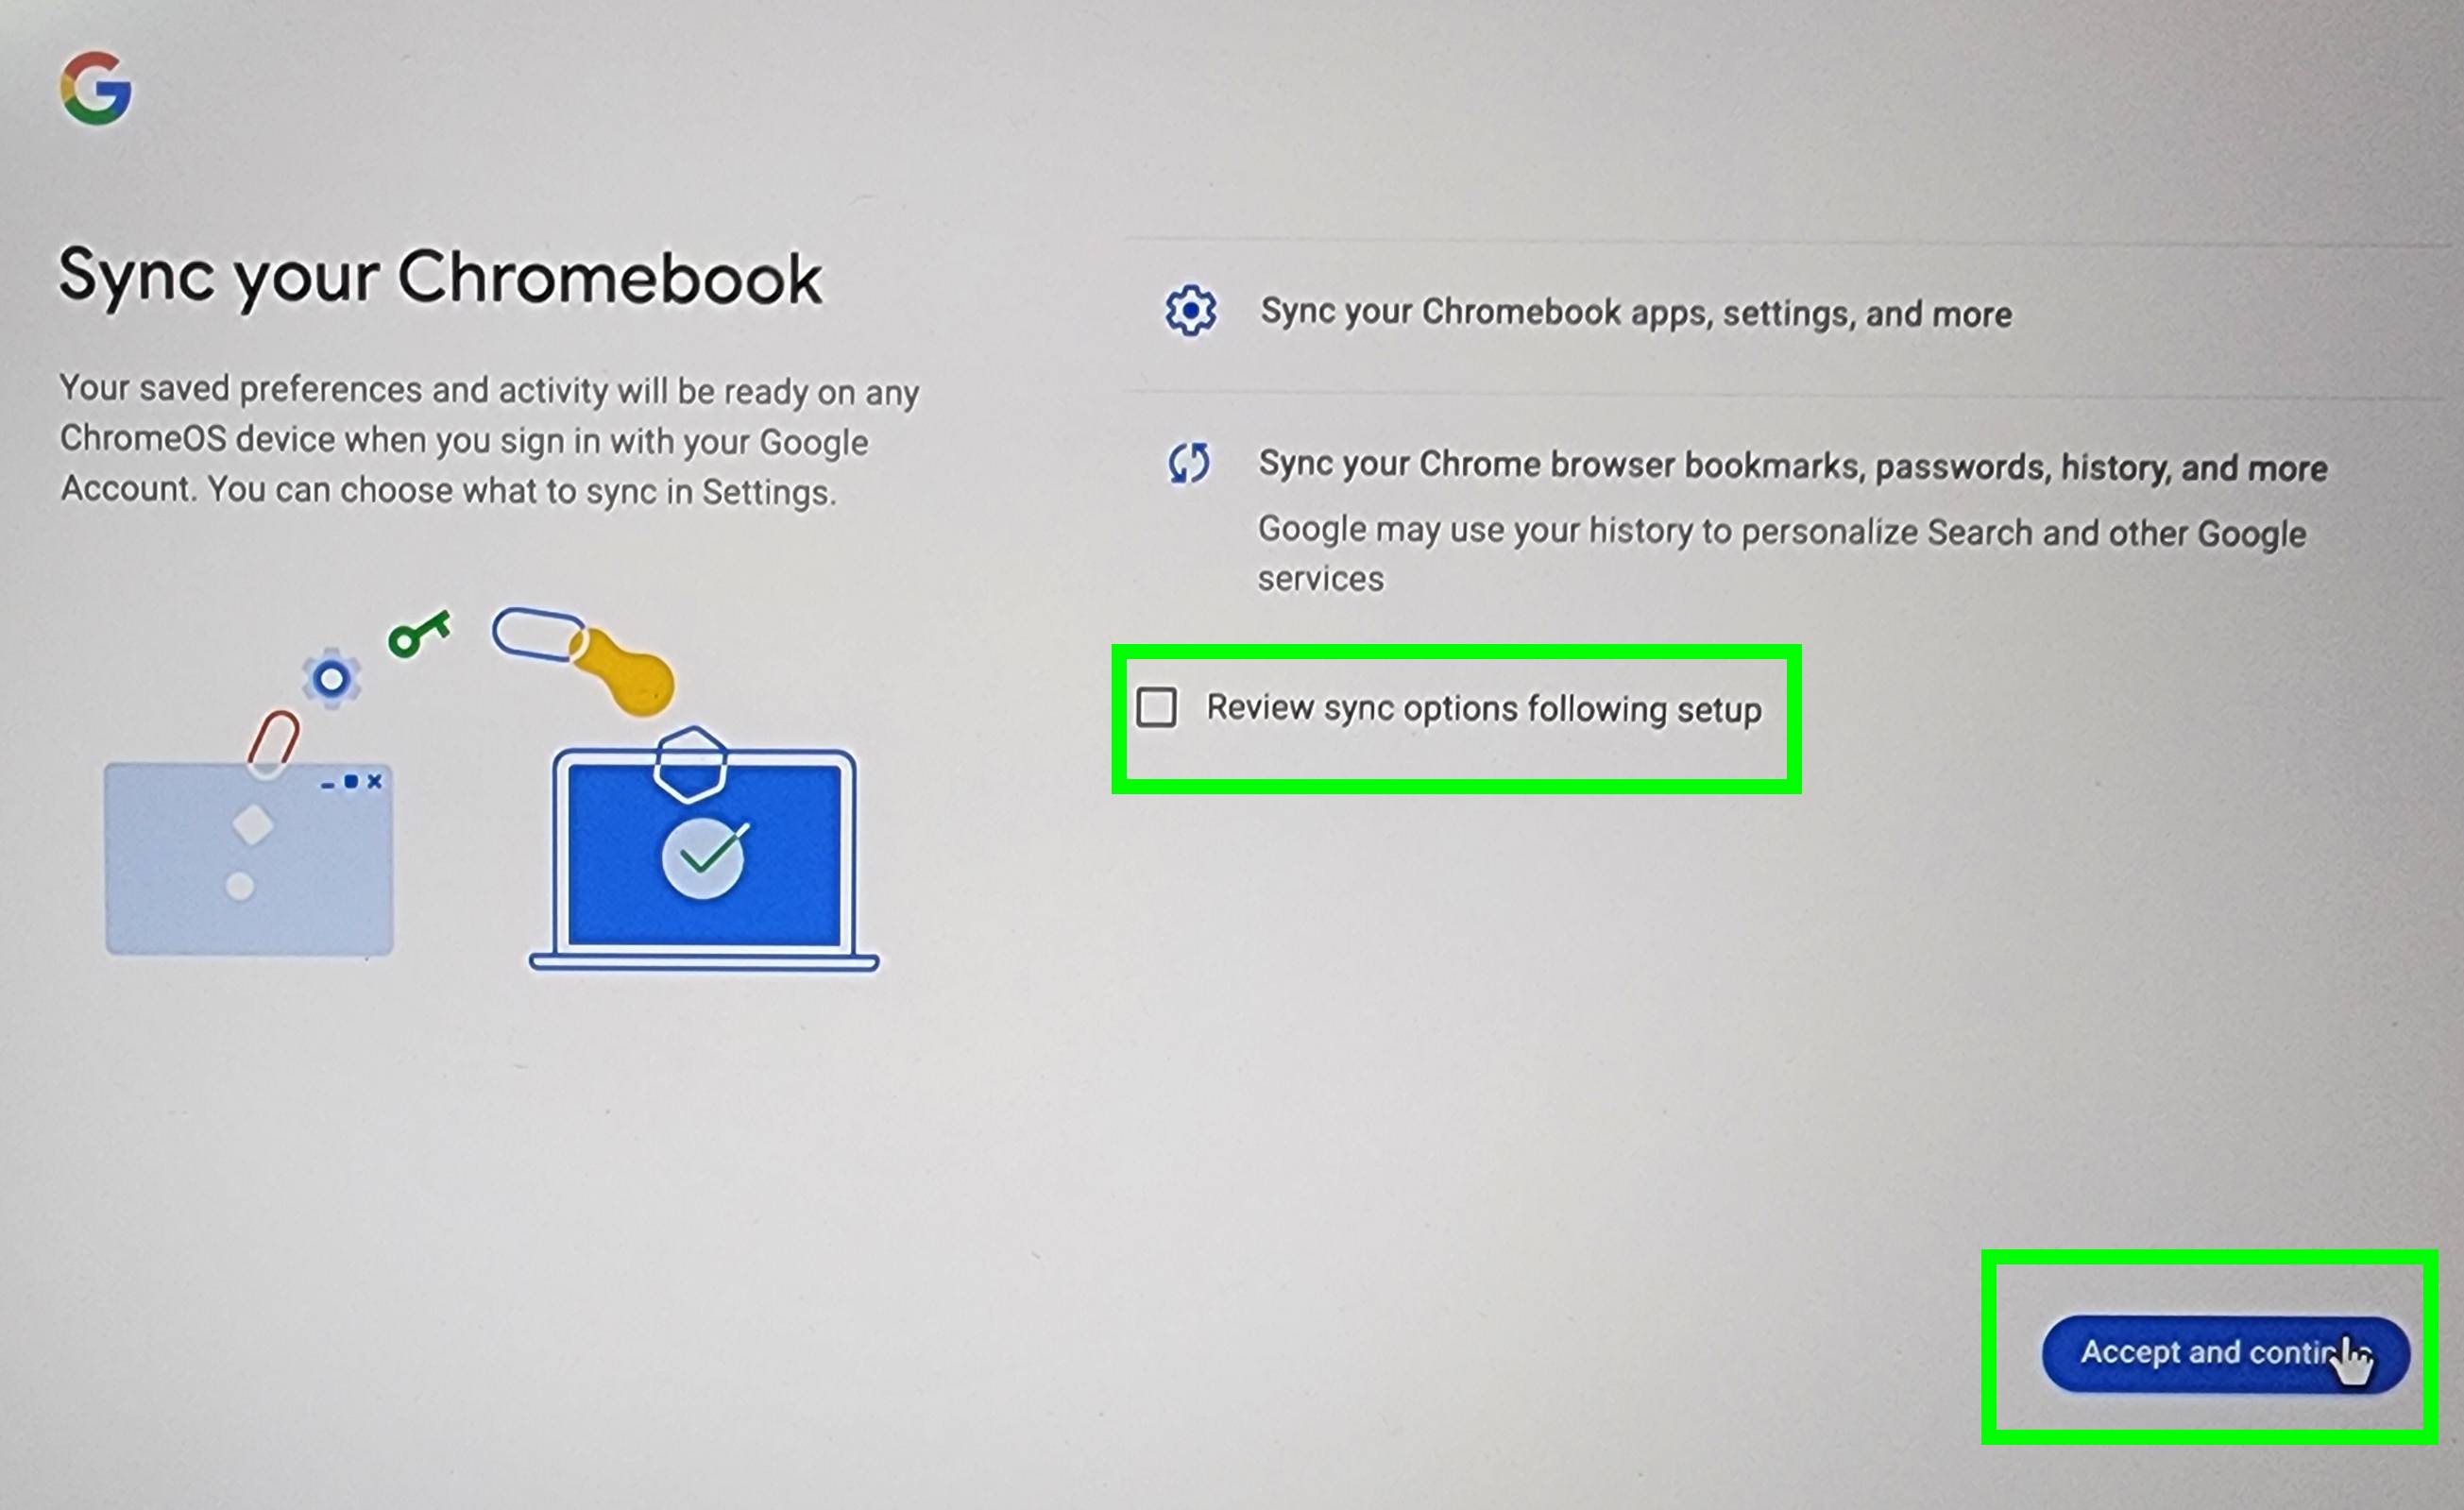
If you already have a Chromebook, Google will automatically sync your Chromebook settings, apps and more with the new Chromebook you are setting up. You can also select “review sync options following setup” if you want to review what is synced after setting up your Chromebook.
In this guide, we are going to check the box “Review sync options following setup,” then click Accept and continue.
7. Create a login PIN
(Image: © Future)
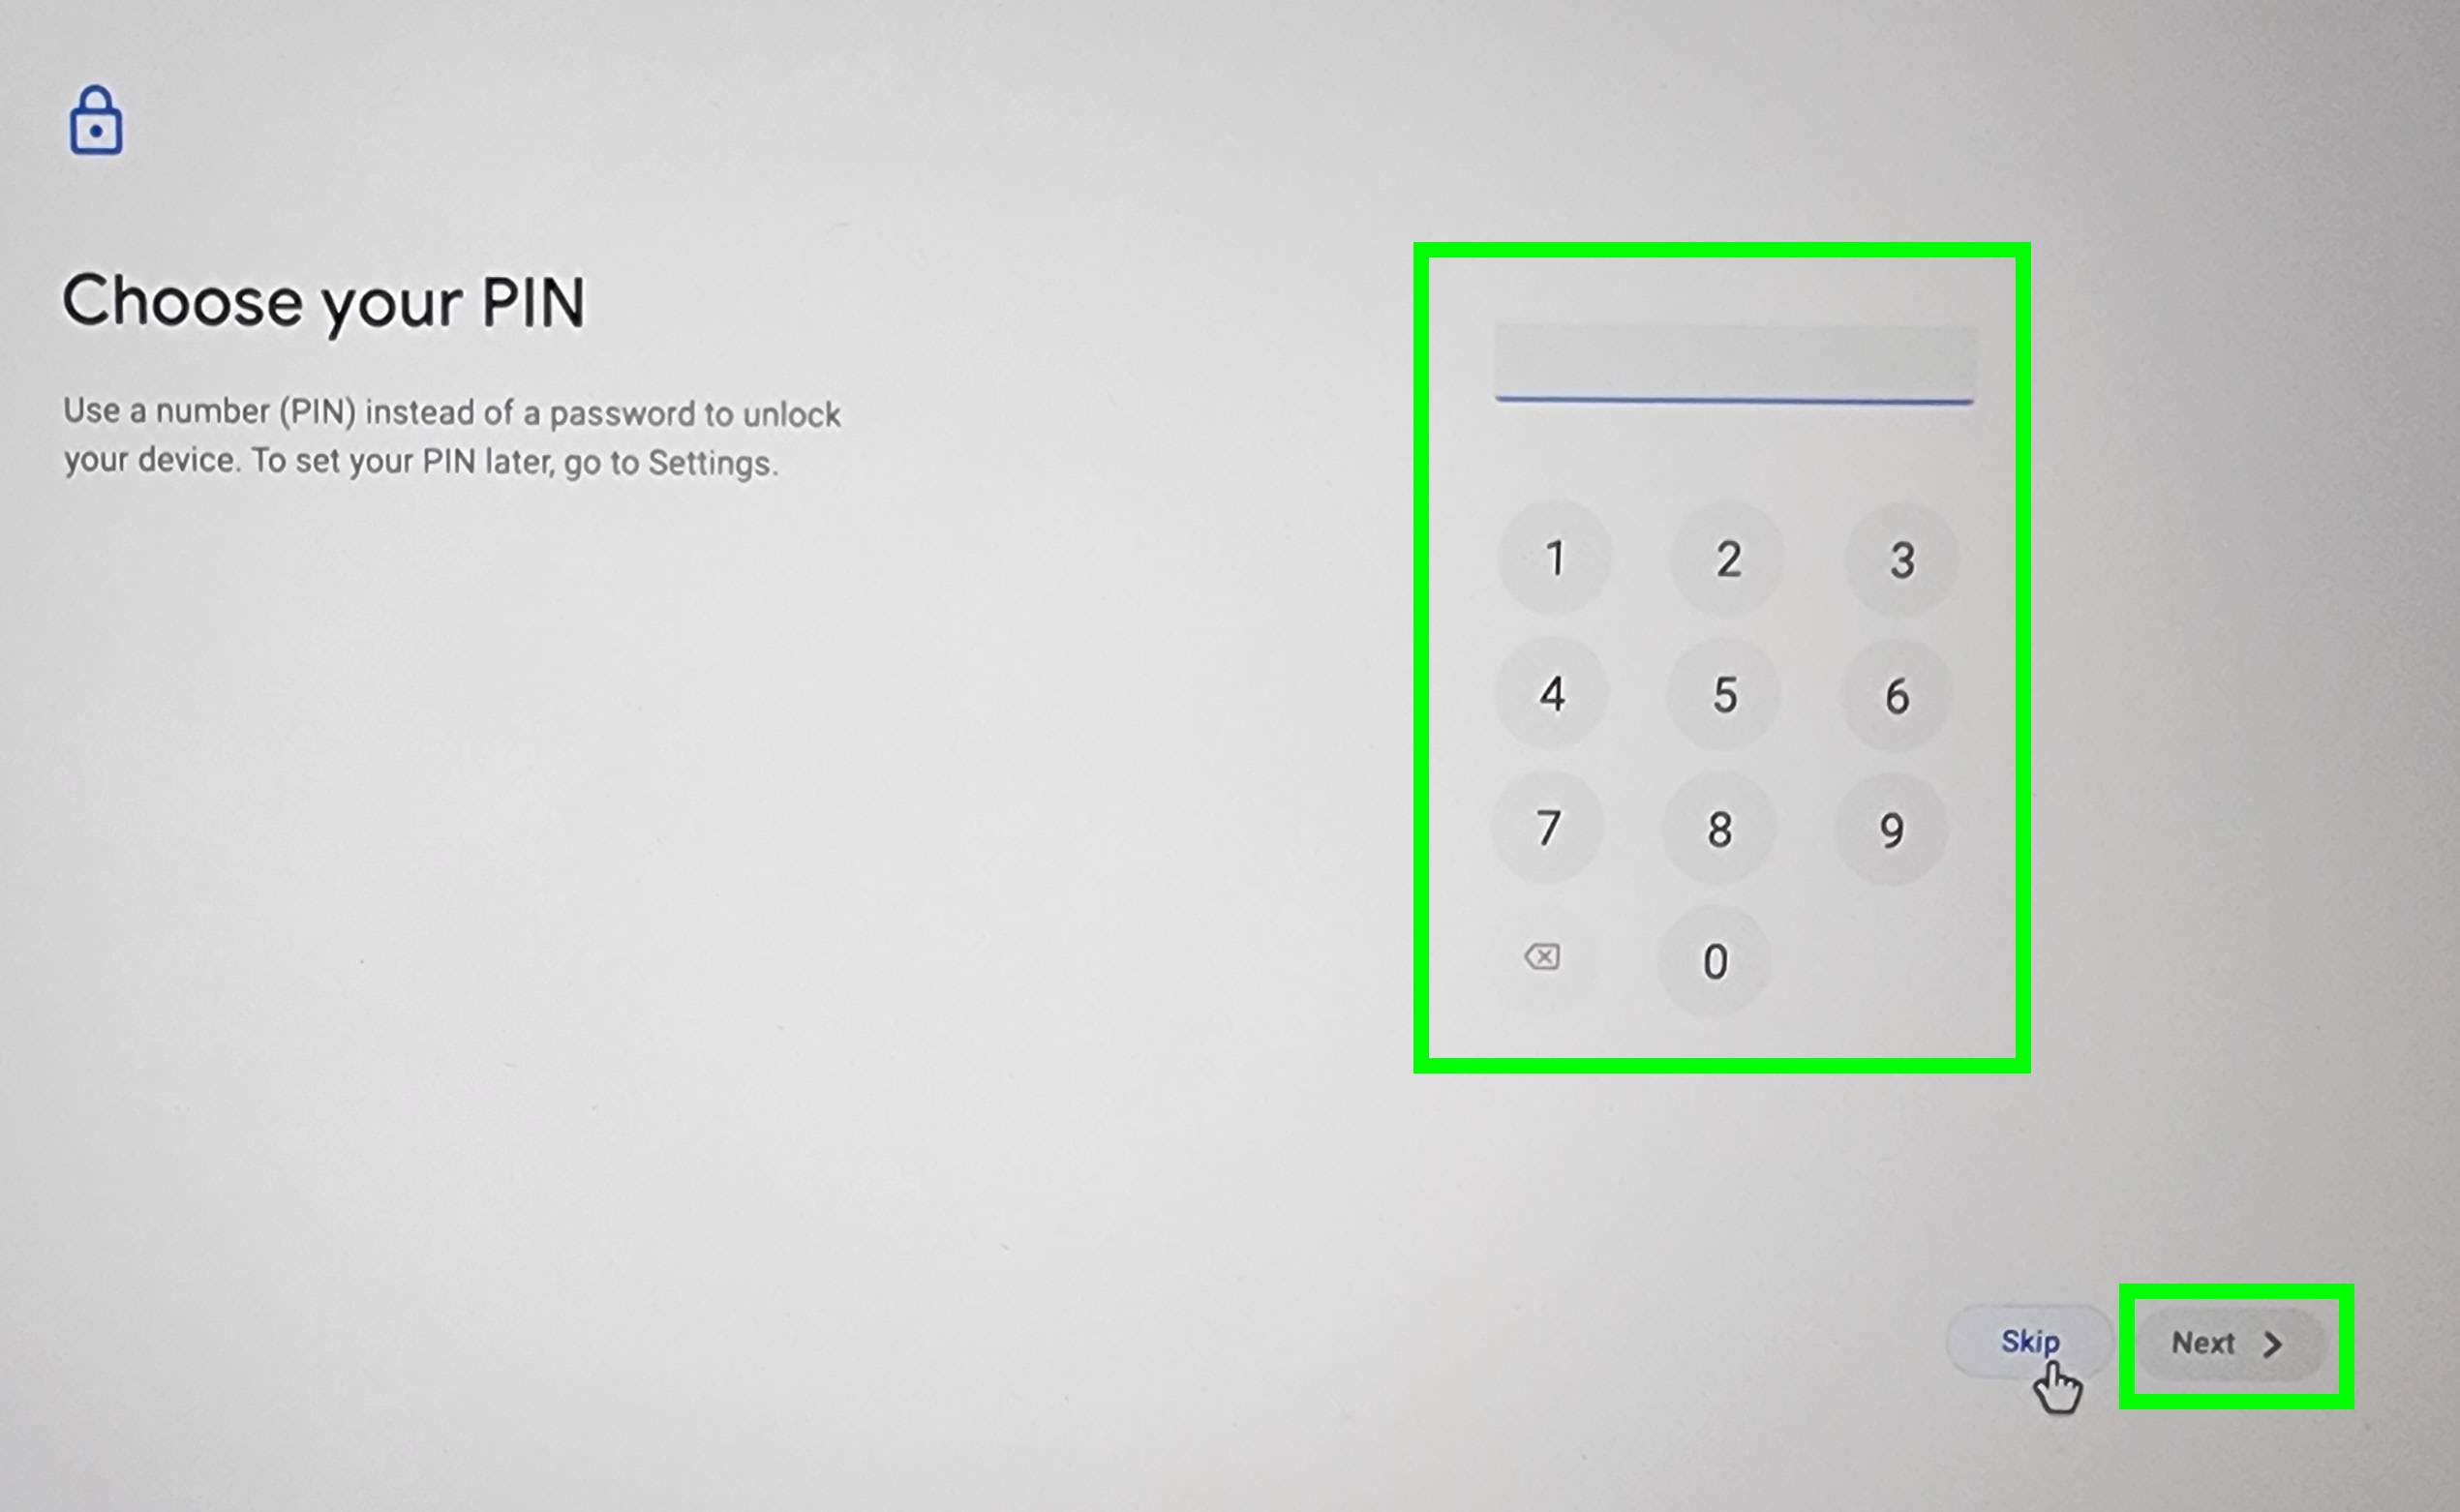
Now it’s time to create a login pin. This can be used to log into your Chromebook instead of using your Google account password.
To set a pin, create a six-digit PIN and then click Next. Then enter your six-digit PIN in again and click Next again.
One thing to keep in mind is that passwords are more secure than pins. So you may want to just skip this step. If you skip this step, you can always set a PIN later in Settings if you decide you want a quicker login method.
8. Set up Google Assistant
(Image: © Future)
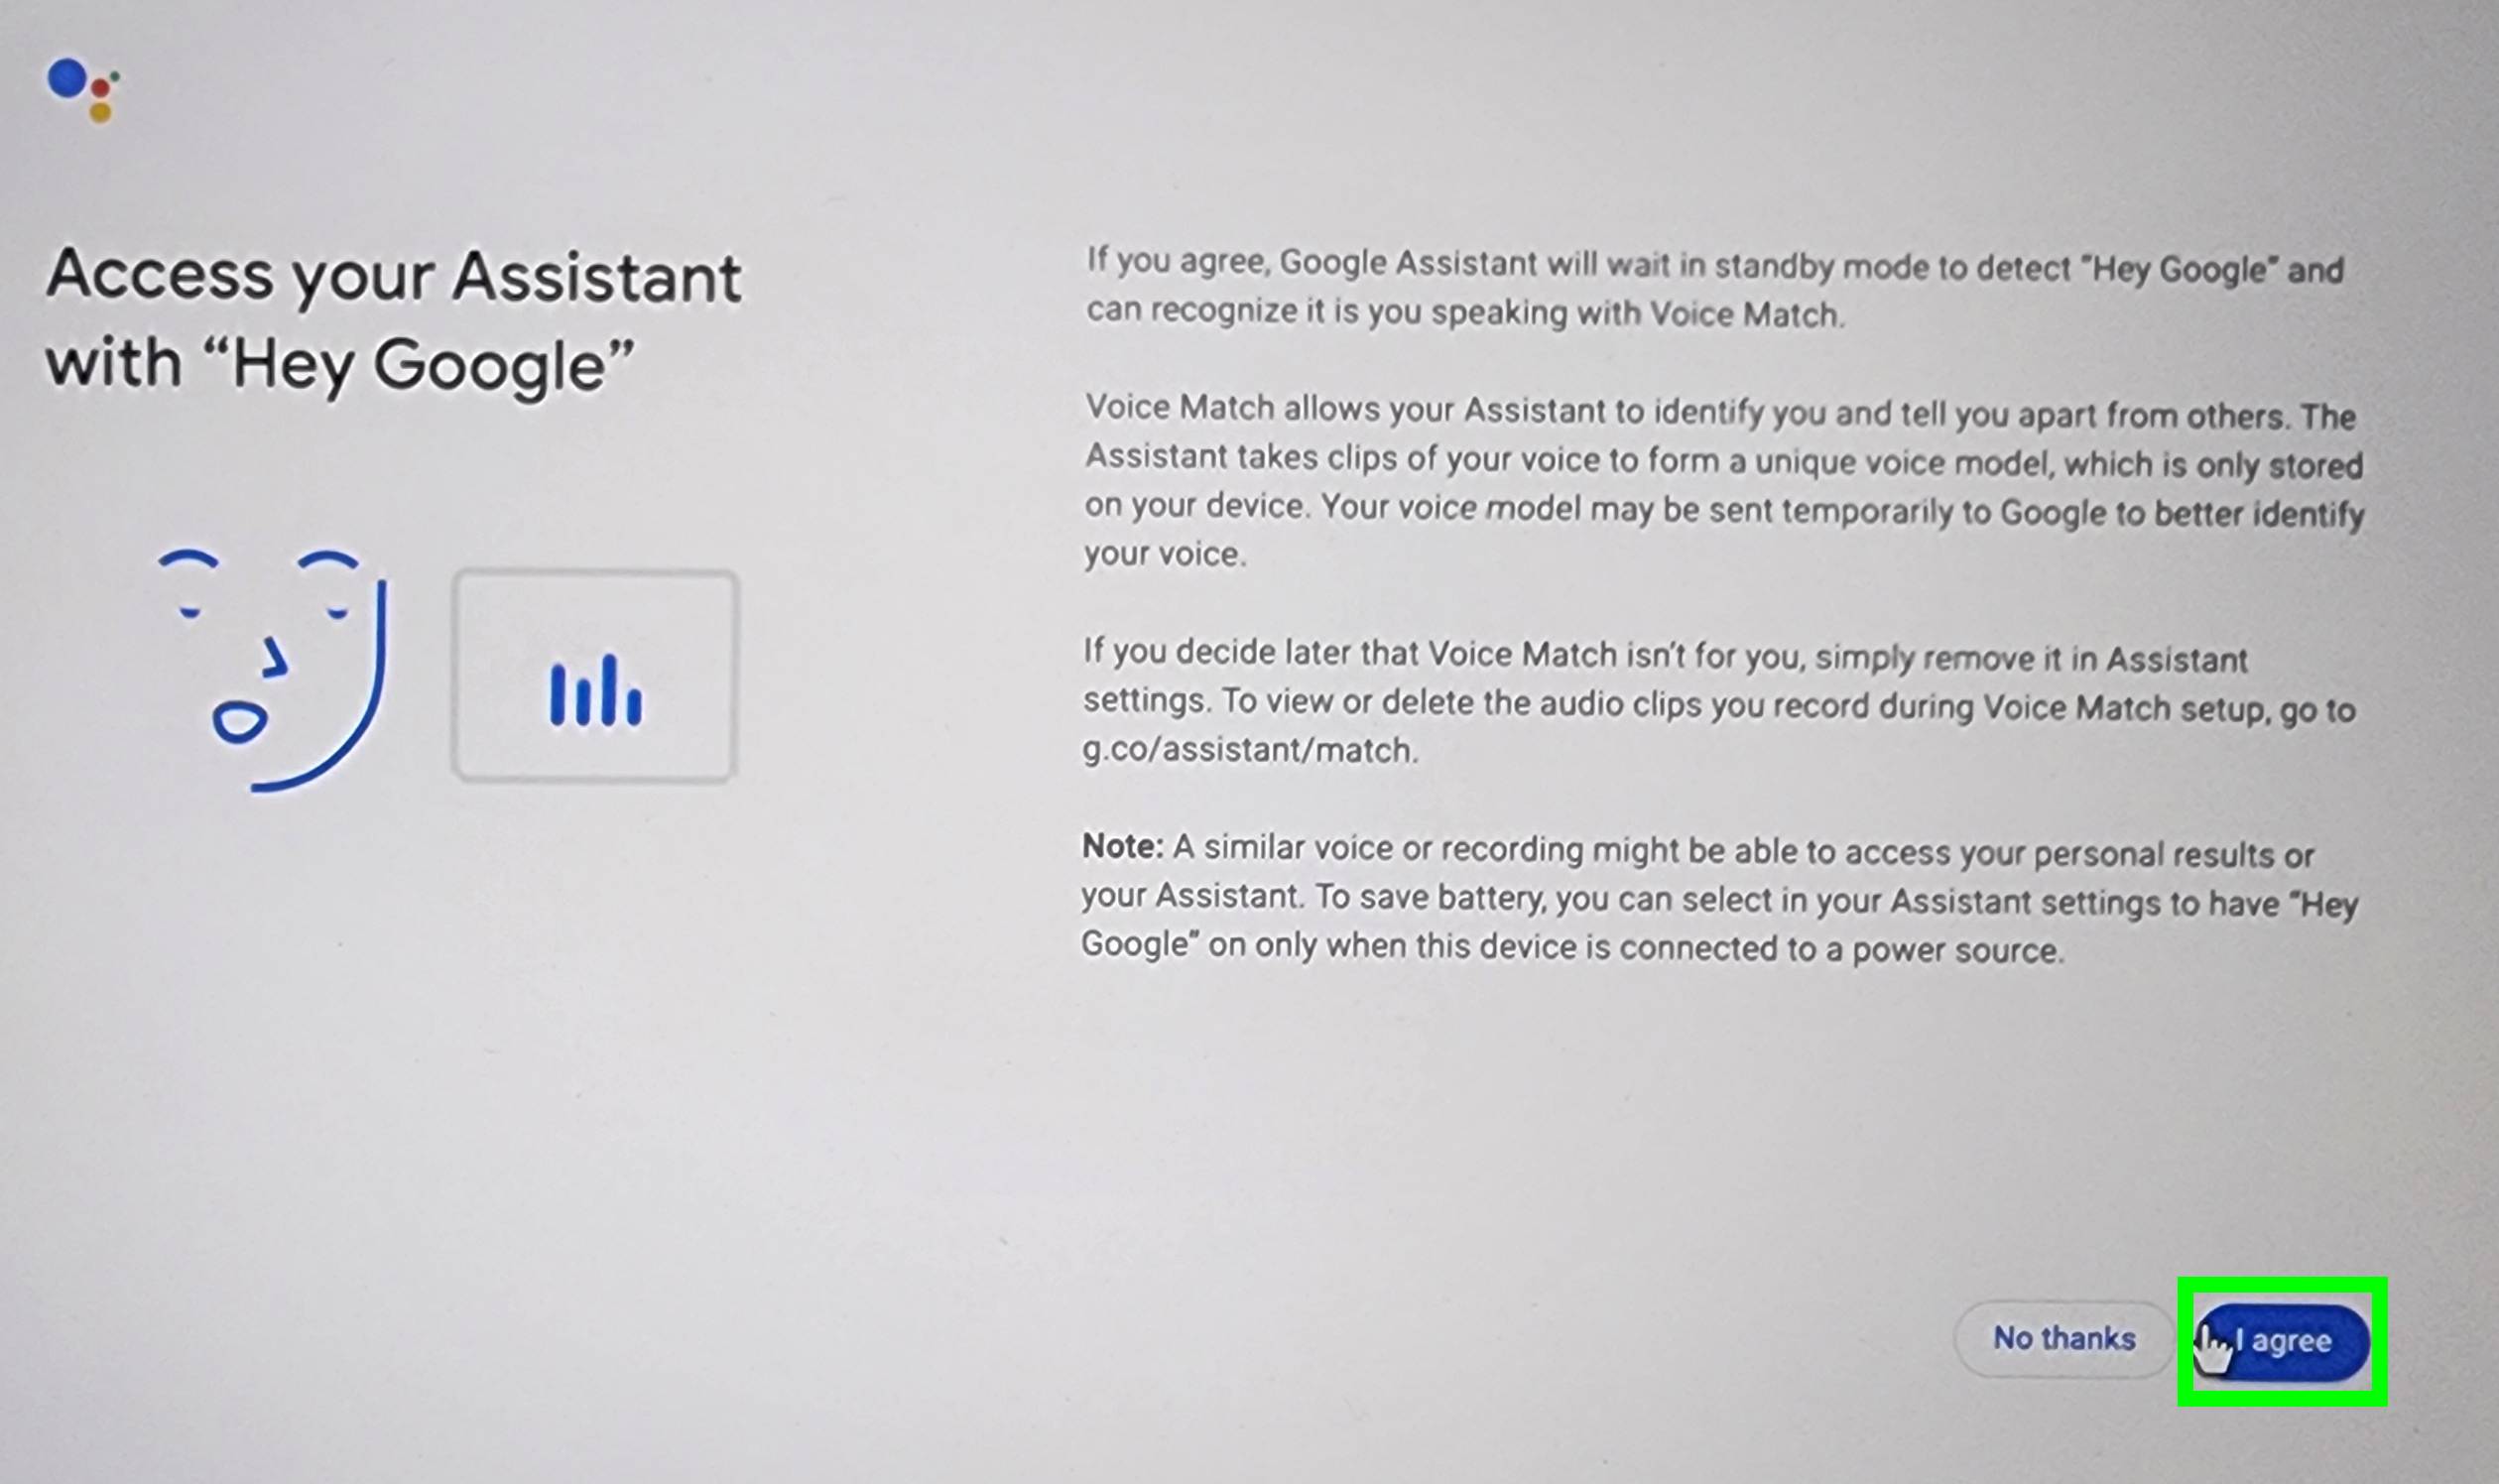
Now you need to set up Google Assistant, Google’s smart assistant. Click I agree to let Google Assistant access your screen to provide more tailored responses or click No thanks to deny this permission.
Then, you have to decide whether or not to allow Google Assistant standby mode. In standby mode, Google Assistant will be always listening for you to say “Hey Google” to activate the smart assistant.
To allow standby mode, select I agree or select No thanks to disable standby mode.
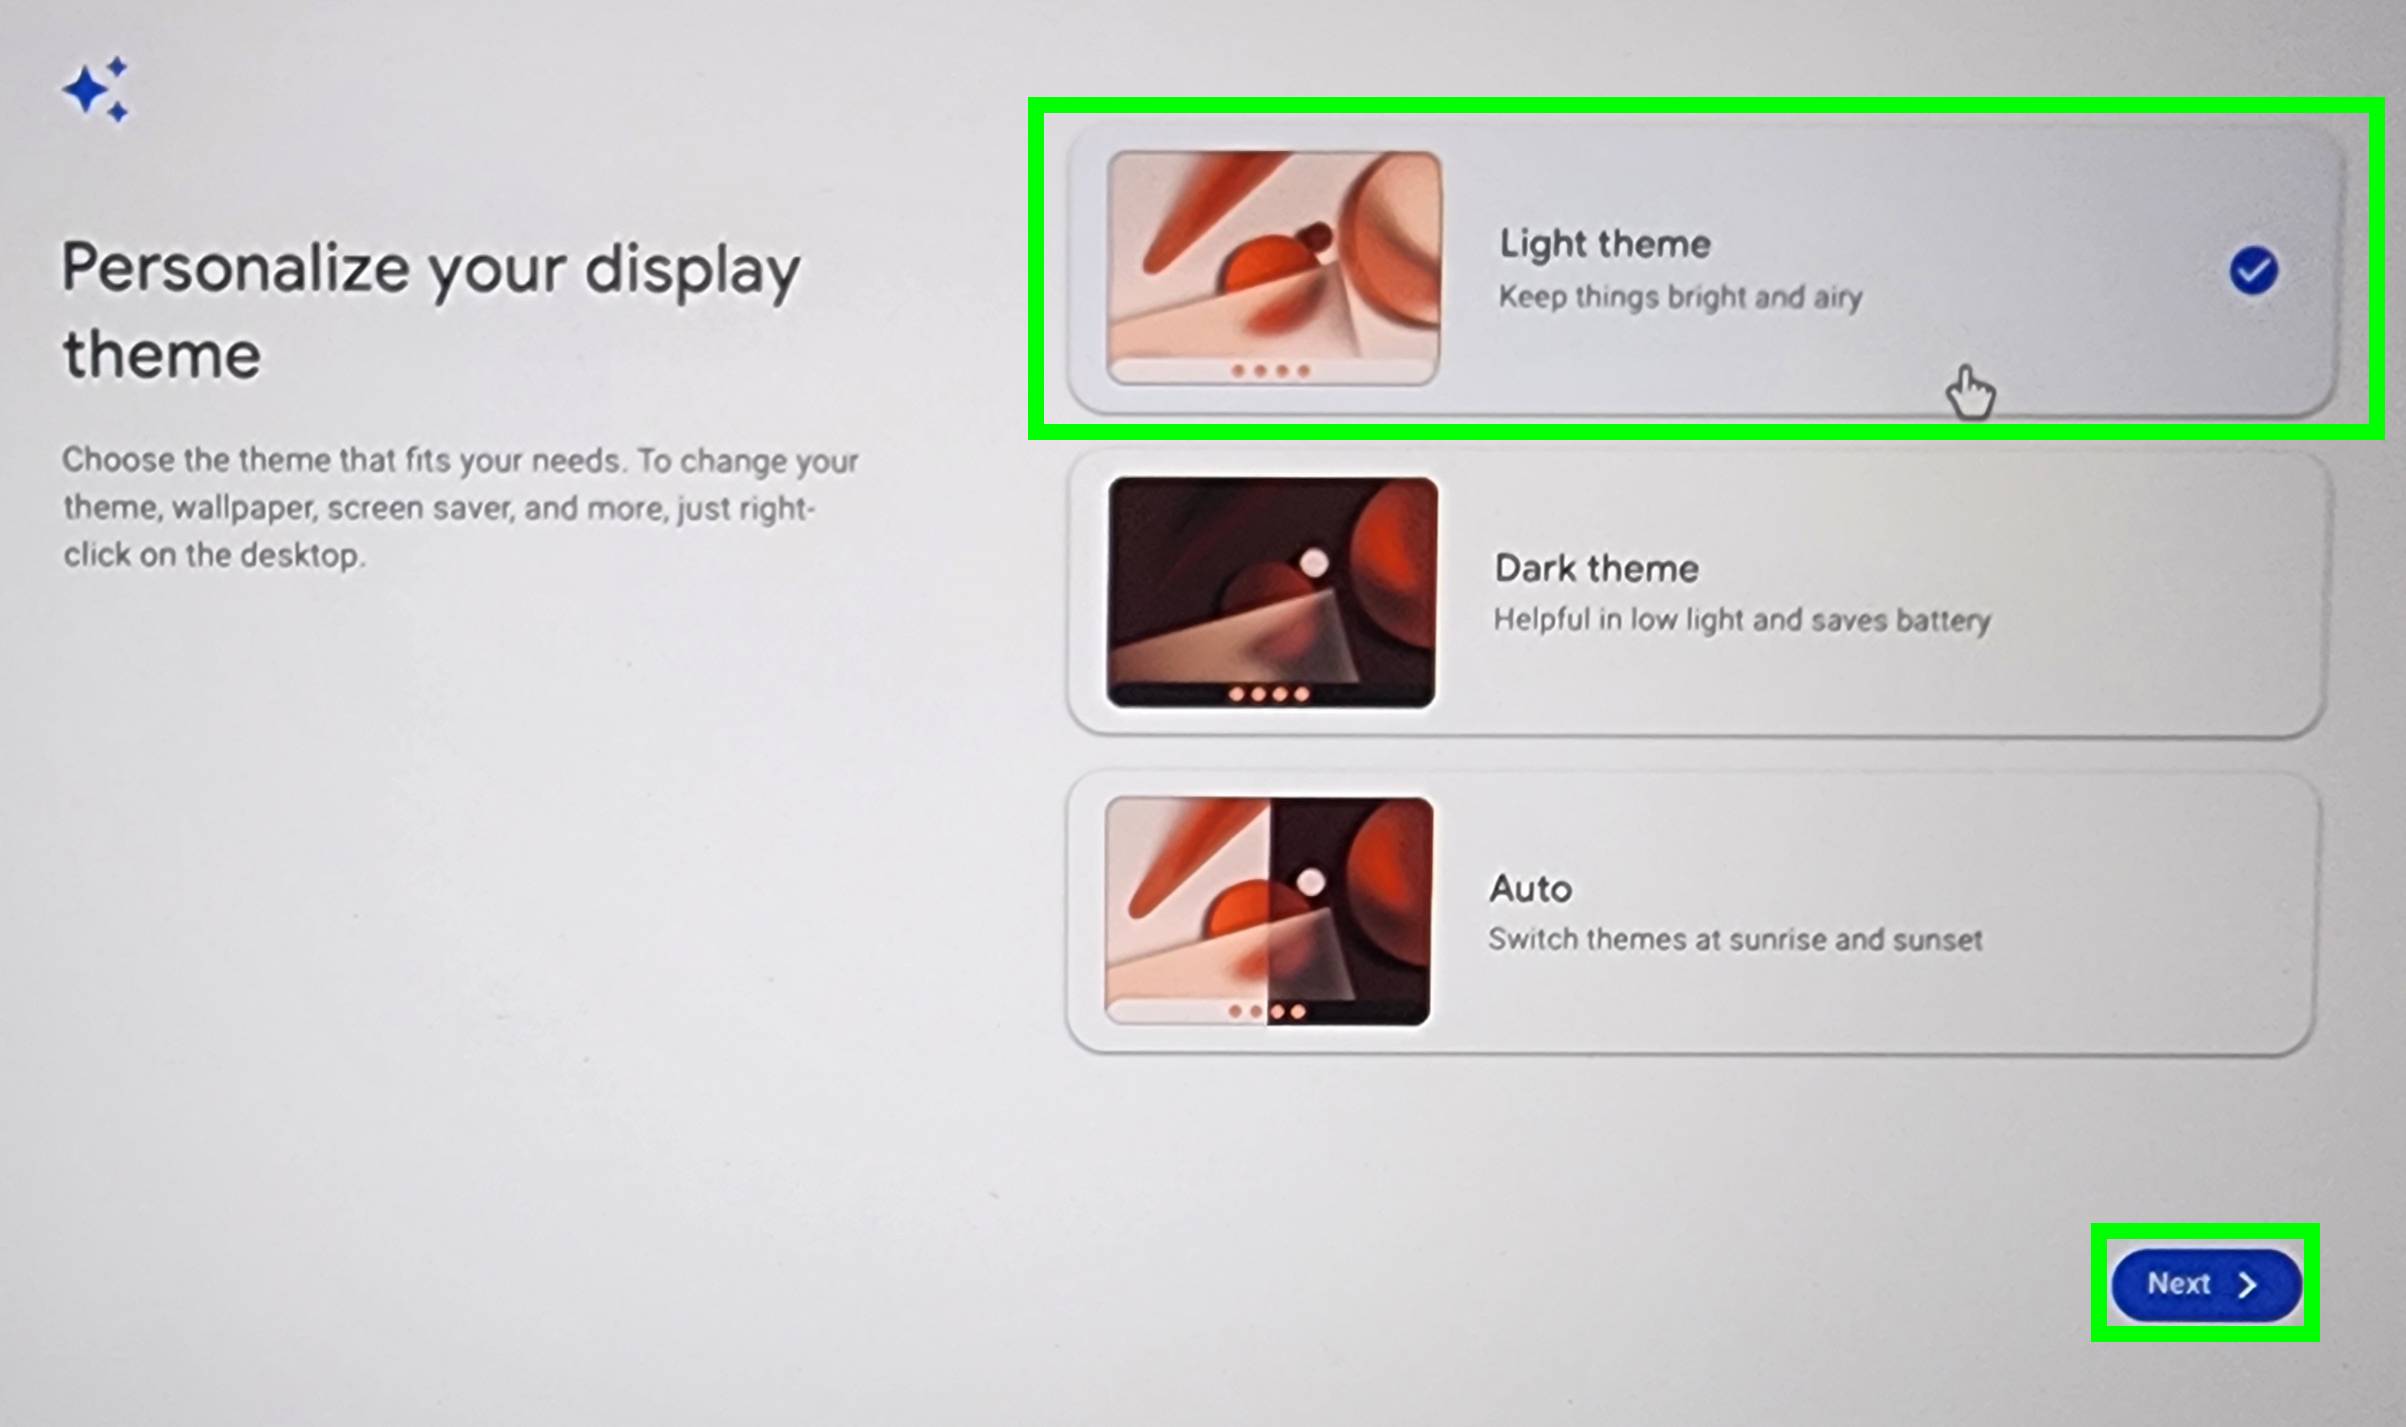
9. Personalize your display theme
(Image: © Future)
The last step is to personalize your display theme. Here, you select whether you want Light theme to keep things brighter, Dark theme to be easier on the eyes and your Chromebook’s battery or Auto to allow the themes to switch at sunrise and sunset.
For this guide, we are going to keep the light theme. Select Light theme, then click Next.
Congrats! Your Chromebook is now set up and ready to use. The only thing you may have left to do is review your sync settings — if you clicked the box to “Review sync options following setup” in step six. This is really easy to do, as your Chromebook will automatically have a Chrome browser window pop up if you checked the box in step six. Simply look over your settings and close the Chrome window.
Quick resets and setups are truly underrated features of Chromebooks as both can be done in minutes. So if you need to reset your Chromebook make sure to check out our guide on how to reset a Chromebook before you get started. And for more Chromebook tips and tricks, check out our guide on how to screenshot on Chromebook. Make sure to also check out how to play Steam games on a Chromebook and how ChromeOS Flex can turn your old laptop into a Chromebook.
More from Tom’s Guide
For all the latest Technology News Click Here
For the latest news and updates, follow us on Google News.
