How to build a website with Squarespace
If you’re looking to build a website, but worry your lack of technical knowledge could hold you back, a popular solution that often appears at the top of the list of the best website builders is Squarespace.
With hundreds of ready-made templates and ample design assistance, you can easily build a website with Squarespace in under an hour—all without knowing a line of code.
Need some convincing that Squarespace is right for you? Check out our Squarespace review to see how we rated it. Otherwise, here are six easy steps to take to build your own website.
Build a website with Squarespace: Preparation
Before you get stuck in with building, it’s worth deciding what you’re going to include on your site. Are you building a portfolio, writing a blog, or hoping to launch an ecommerce store? Knowing the purpose of your site ahead of creation will help you decide on the best template design and price plan for your needs. Have a browse of similar websites to see how other businesses advertise their wares for inspiration.
Once you know what you’re creating, you’ll need to make a Squarespace account—head to the Squarespace homepage and click “Get Started” to begin. It’s worth mentioning that—while you can trial Squarespace’s free plan for two weeks—there is currently no long-term free plan available. However, creating an account requires no payment details, so you’re free to explore the platform beforehand.
Step 1: Choose your template and site name
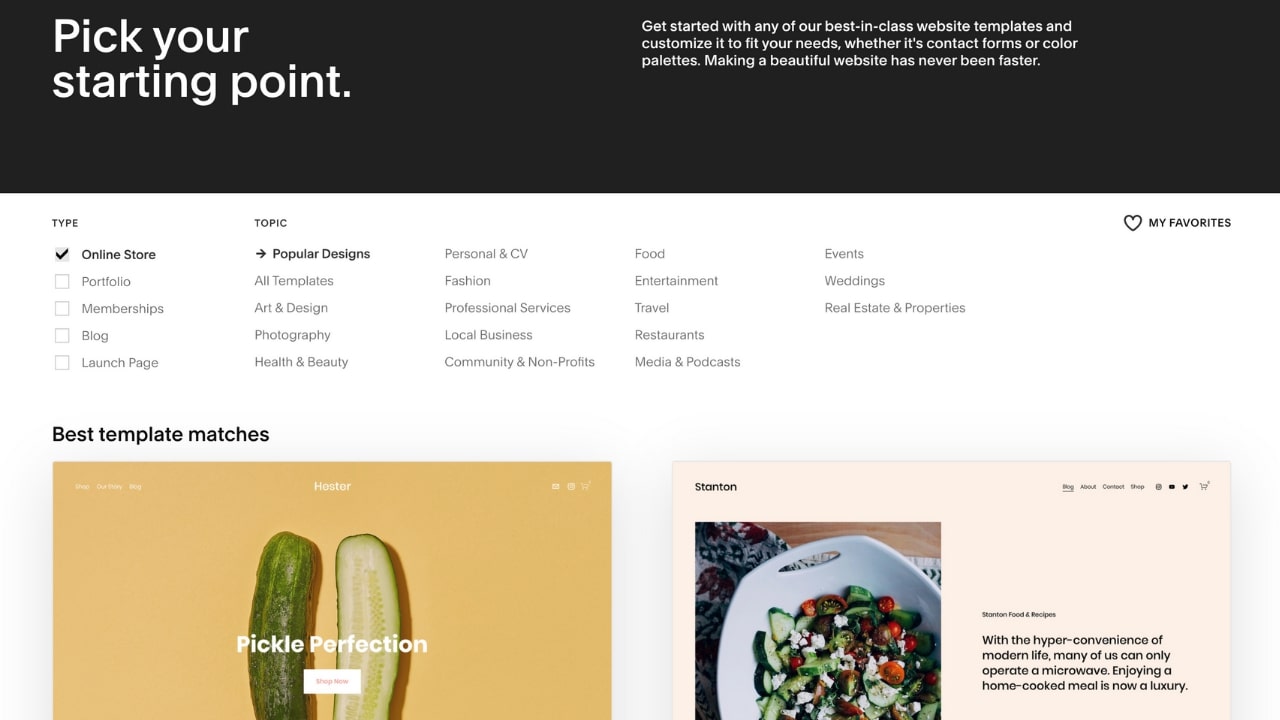
Squarespace blows rival website builders out of the water with its stunning range of templates. All are created by professional designers, are fully customizable and mobile responsive, and each one is tailored to a specific industry or function—from portfolios and blogs to online stores and restaurants.
Take your time browsing and previewing what’s on offer—the template you decide on will serve as your canvas, so it’s worth previewing any that you like to find one that matches your requirements.
After selecting your template, you’ll need to enter a name for your site—though you can change this later when editing, so don’t worry if you have yet to decide.
Step 2: Start customizing
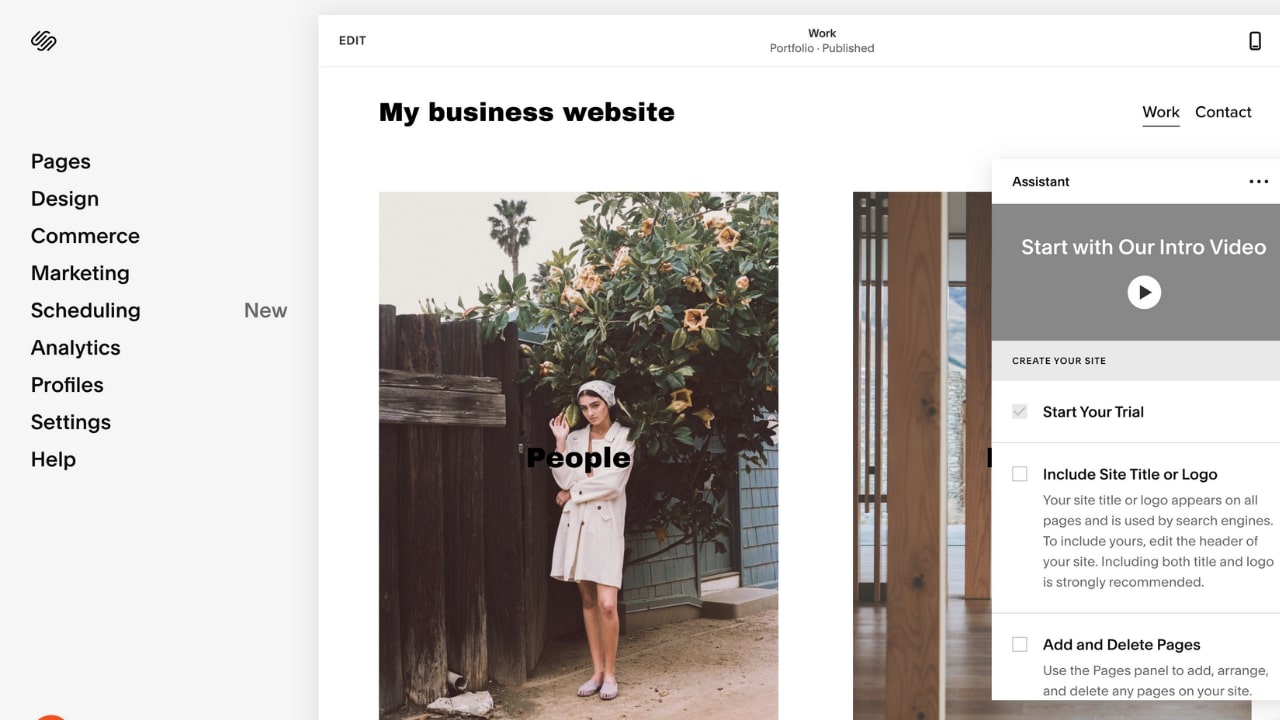
After naming your site, it’s time to start customizing. Upon being directed to the build page, you’ll notice a handy assistant pops up on the right. It’s worth watching the tutorial video provided here, as—although Squarespace is relatively simple to understand—the design interface can take some getting used to.
The assistant also provides a useful design checklist to work through, prompting you to add your site logo, change colors and fonts, and add or delete pages. To begin editing the blocks on the page, simply click on one—this will present a box where you can customize elements like the text, background image, section height and width, and color palette.
For further customization, head to the left-hand column and select the “Design” option. Here, you can adjust your overall site style to ensure consistency with colors and fonts, edit your browser icon, or even add additional CSS code. Select “Pages” from the left-hand column to add or remove any pages, or to select an existing one to customize.
If you’d like ecommerce integrated into your site, the left-hand column is also where to go—select “Commerce” to begin, and follow the steps provided to get started. There’s plenty of on-screen help when building, but you can find additional tutorials on Squarespace’s knowledge base if you’re unsure of anything.
Step 3: Add some content
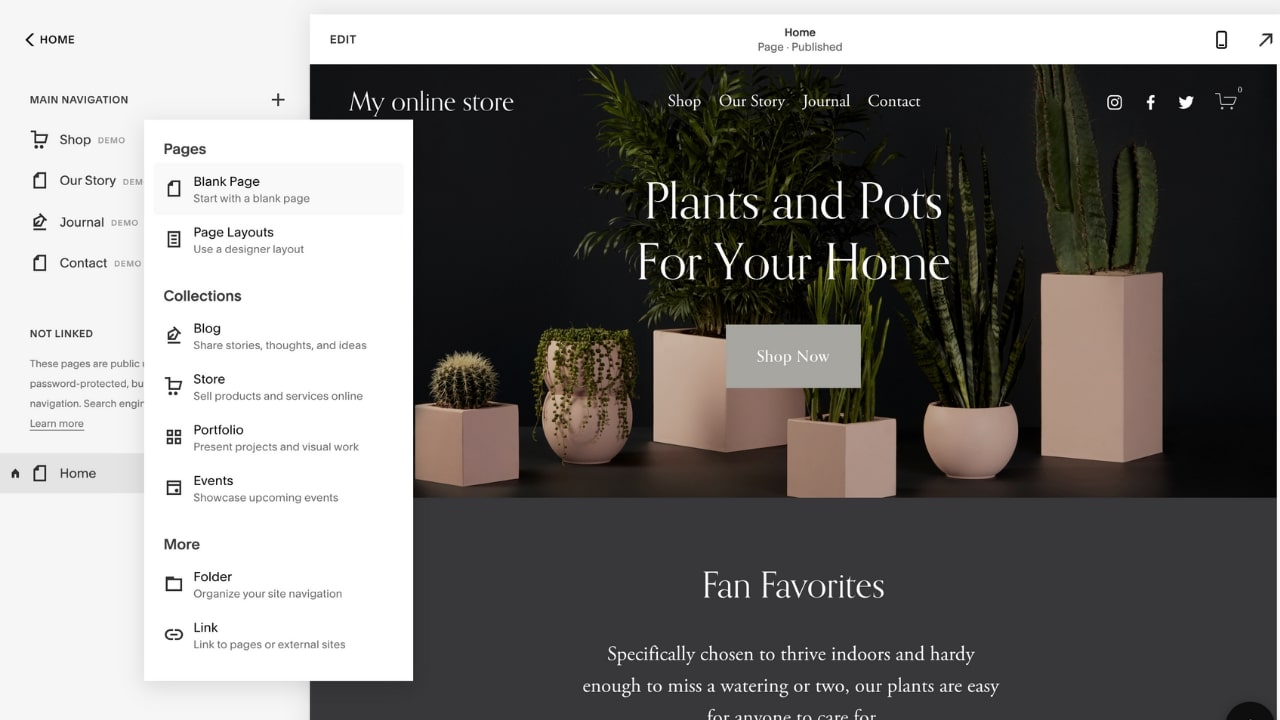
The type of website you’re creating will determine the content you add, but it’s a good idea to populate your platform with plenty for visitors to engage with before launching.
For example, if you’d like to incorporate a blog—the benefits of which can include increased traffic to your site—you can add a specific page for this before publishing. Head to “Pages” in the left-hand toolbar, and click the plus symbol at the top of the list. You can then select a blog page and begin adding your content straight away.
Alternatively, you could also add a portfolio page, event listing, or store straight from the list.
Step 4: Select your custom domain name
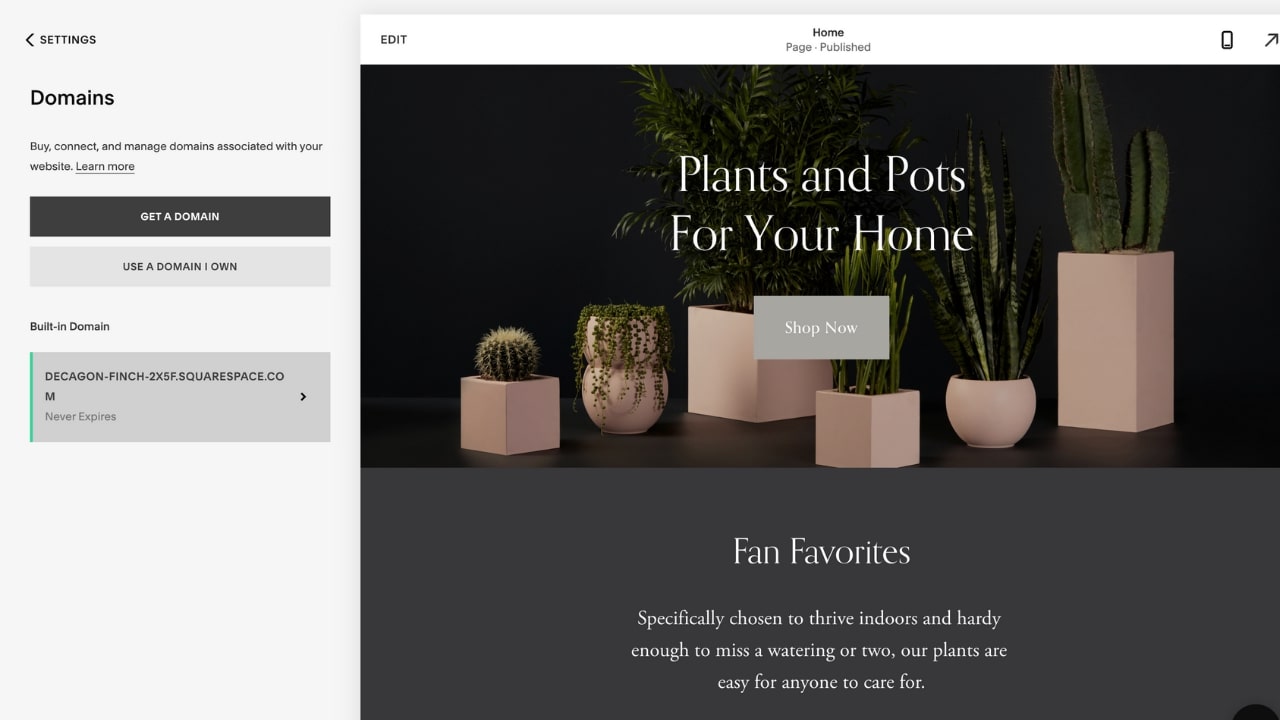
A custom domain name is recommended to help your website attract visitors or potential business. While you can use the automatically generated URL that Squarespace provides, it will have branding at the end of your website’s address (.squarespace.com), which could affect your ranking on search engines and make your site harder to find.
To avoid this, you can purchase a custom domain. When on the build page, head back to the left-hand toolbar and click “Settings” and then “Domains”—here, you can either connect a domain you already own, or follow the link through to purchase one through Squarespace. Prices vary, but usually fall around the $20 mark.
Keep in mind that you can get a domain name free for a year if you upgrade to an annual paid plan—we’ll explain this further in step six.
Step 5: Optimize your site
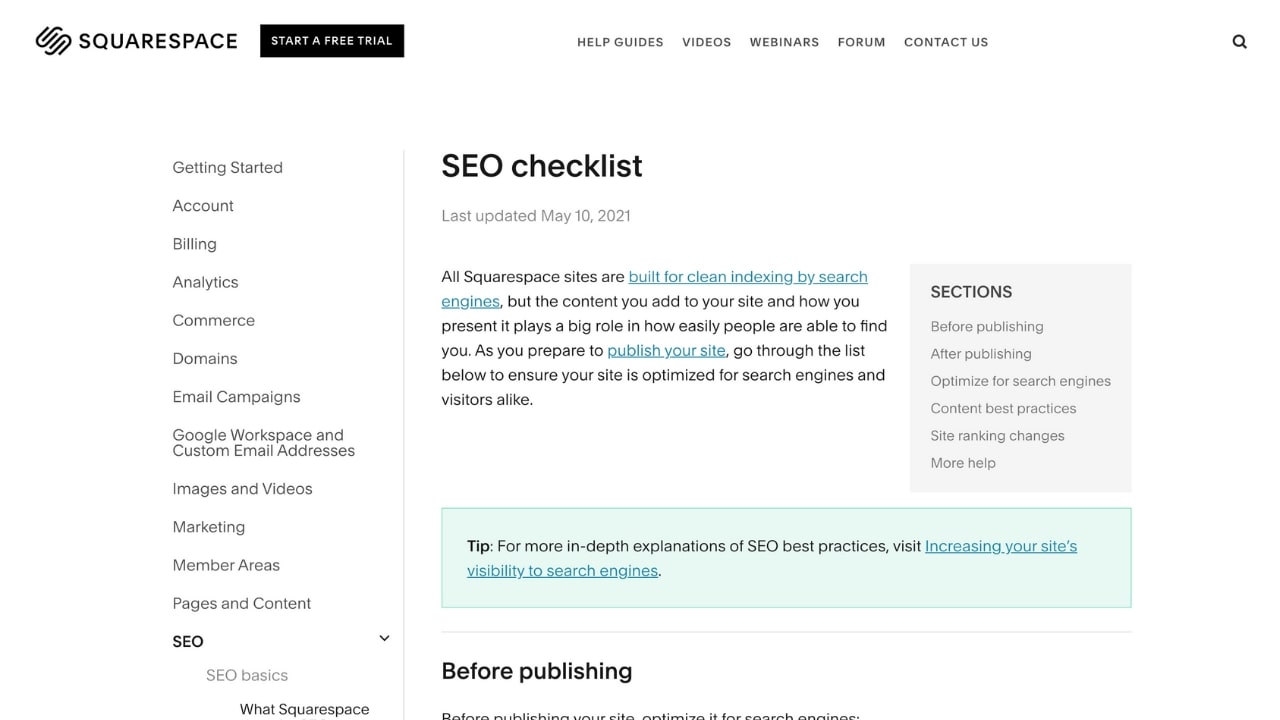
Next up is optimizing your website for search engines. Ranking well on search engines is fundamental for attracting clients to your website, and Squarespace’s built-in SEO (search engine optimization) tools make it simple to get started.
In the left-hand toolbar, click “Marketing” and then “SEO”. Here, you’ll find a handy SEO checklist to follow to begin optimizing your site, prompting you to add things like a site description, SEO descriptions to individual pages, and links to your social media accounts.
As you’ll have come to expect with Squarespace, everything is clearly labeled, technical jargon is kept to a minimum, and on-screen tips are there to help you if you get stuck.
Alongside this, Squarespace automatically provides a generated sitemap, allows the customization of meta descriptions and image alt tags, and enables you to directly search Google keyword analytics to find out what people are searching for within your niche.
Step 6: Upgrade your plan and publish your site
Although you have two weeks before needing to upgrade your free plan, you’ll have to do so beforehand if you wish to publish your site.
To upgrade your website plan, click “Subscribe” at the bottom of the assistant box. You’ll then be presented with four options—the cheapest of which is the Personal plan, costing $12 a month if paid upfront for an annual subscription. As well as being cheaper, annual plans also include a free domain name for a year, so this is worth considering if you plan to upgrade your site address anyway.
Other plans include the Business ($18), the Commerce Basic ($26), and the Commerce Advanced ($40)—the last two of which you’ll want to consider if you wish to integrate ecommerce into your site.
Once you’ve chosen a plan and entered your payment details, you can then publish and launch your site.
Summary
Congratulations, your website is now live! That doesn’t mean you should let it stagnate, though—it’s vital that you keep adding new content and update your website regularly to encourage both new and returning visitors.
You’ll also want to keep sharing news, content, or products on your website so that your visitors have access to the latest information about you or your business. Increase your traffic further by spreading the word frequently; cross-promote your site and its content on social media, or use email campaigns to boost your site’s engagement.
If you’re still unsure whether Squarespace is right for you, our Squarespace review can tell you everything you need to know. We’ve also compared it to other builders in our articles pitting WordPress vs Wix vs Squarespace, Wix vs Squarespace vs Weebly, and an in-depth, direct comparison matching the two sector leaders: Wix vs Squarespace.
Otherwise, enjoy your new website!
For all the latest Technology News Click Here
For the latest news and updates, follow us on Google News.
